Rebekah is the bees knees! (sorry, I couldn’t resist!) I love what she’s done with the Sweet Life pattern, check it out! – Betz

Hello! It’s Rebekah from The Little Red Thread back to share some fab tips and a fun twist on Betz’s beautiful Sweet Life Pillow pattern, below.

I love, love, love this method of applique. Reverse applique is one of my favorite ways to do applique. It’s a quick and accurate way of producing works of art that look like they took you days to whip up. Betz’s pattern from Present Perfect includes easy to follow step by step directions on how to create your own bee applique flawlessly

Here are a few additional tips to make your Bee applique even easier:
• Prewash your applique rectangle and your felt rectangle in warm water, then press dry with a hot iron, no steam. This will allow your fabric and felt to shrink before you start sewing and reduce the amount of puckering later on.
• Use another sheet of stabilizer on the wrong side of your applique rectangle to help further stabilize your stitching. It also helps to keep the cotton fabric from stretching as you turn the bee.
• After you have finished sewing the bee applique and washed away the stabilizer and pressed it as dry as possible, continue to help it dry with your iron (cotton setting/no steam). With the felt side down gently press one quadrant at a time until no longer damp.
• Use a seam ripper to start your initial felt cut. It will allow you to gently poke between the two layers and run a long starting rip without fear of snipping thru both the felt and the applique rectangle beneath. Once you have your starting cut it’s much easier to get your scissors in between the layers.
I got a deep satisfaction from cutting away little bits of felt and seeing the fabric underneath. A little bit of effort for a huge impact. I chose this pattern for the WOW factor alone. It most certainly has flare. Have you seen Betz’s pictures of her students that have done this pattern, wowza!
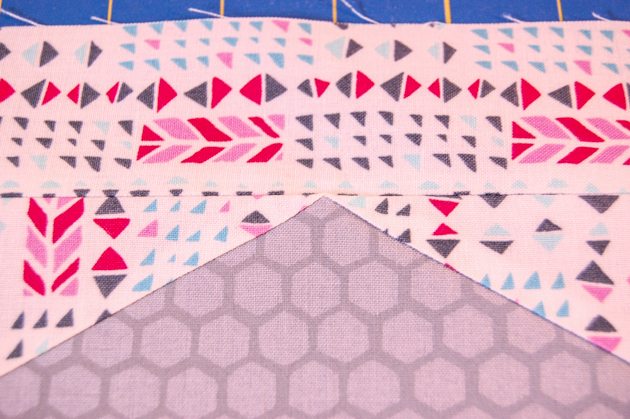
The bee applique is the most complicated part of the pattern and once it’s done you can move on to the pillow front, a lovely hexagon shape that is easy to piece accurately with the help of the templates provided within Present Perfect.
I love how templates can help everyone achieve great results with minimal effort. Templates allow for consistency which is essential when sewing any triangle or hexagon shape. I, personally, hate it when my triangle or hexagon points disappear in the seam allowance after all my effort to be accurate in my cutting and sewing, so here’s a hot tip to get perfect points on your hexagon once you’ve sewn on all the triangle pieces.
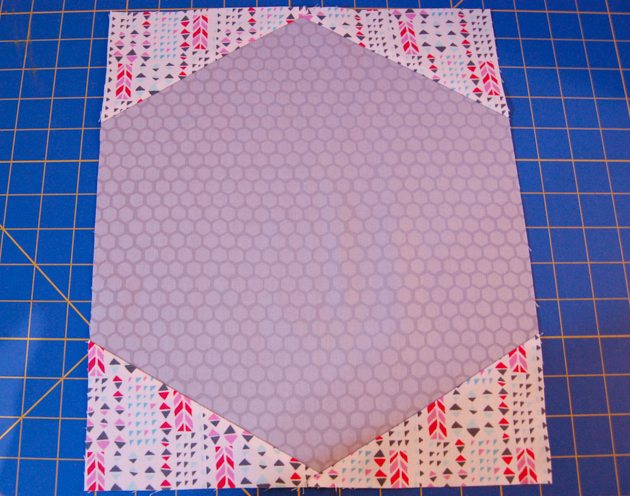
Turn your finished center block piece over and look at the intersecting seams, you’ll notice that “X” marks the spot.

The key to getting a perfect point is to make sure your ¼” seam allowance stays above the “X”. Think of the “X” as the tip of your triangle or hexagon. You may find it easier to keep your “X” in sight if you sew with the center block (wrong side up) on top of your border strip.

The pattern continues on in a straightforward manner allowing you to complete a beautiful, stylish pillow in no time, but how could you do just one?! Betz has done such a great job creating this pattern that I didn’t make this just once, I made it three times!
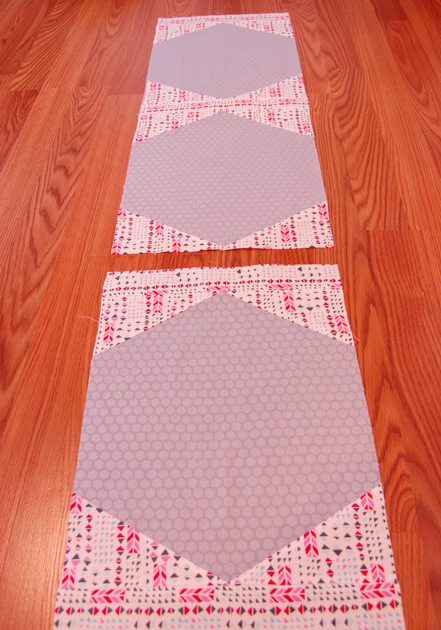
Following Betz’s Sweet Life Pillow pattern, I created three separate bee applique pillow fronts and joined them together to form a Sweet Life Wall Hanging.
To make your own Sweet Life Wall Hanging here’s what you’ll need:
• 1 yd of main fabric for the front borders and triangle pieces
• 3 pieces of 8 ½” x 11” felt for your bees
• ½ yd of accent fabric for your hexagon
• 1 yd of backing fabric (this will be enough to make your binding too)
• ½ yd of batting
• 3 to 6 sheets of self-adhesive water soluble stabilizer
• ⅜” dowel rod, cut to the width of your wall hanging
• basic sewing implements
*** all seam allowance are ¼”
• Create your bee applique following steps 1-7 from the Sweet Life Pillow Pattern
• Cut (3) hexagons, (6) triangle pieces and (6) reverse triangle pieces using the templates provided with the pattern and sew them as directed in step 8 to create 3 center blocks.
• Cut (4) 2” x 16 ½” strips from your main fabric. Sew one strip to the top of one of your blocks and another strip to the bottom of the same block.

Repeat this for another center block for a total of 2 striped center blocks. You’ll have one center block without a top or bottom strip, this will become your middle center block. Trim excess strip fabric even with your block.
• Join your blocks together by sewing a striped center block to the middle center block. Finish it by sewing the last striped center block to the bottom of the middle center block.
• Cut (4) 2” x WOF strips for your side border pieces (these will be really long). Join 2 pieces to make one long continuous strip and sew to one side of your blocks. Repeat for the remaining two pieces sewing it to the opposite side to complete the side borders. Trim excess fabric even with the top and bottom of your wall hanging front.
• Cut (2) pieces of backing fabric (you may need to do some creative piecing here), sew together, and make your quilt sandwich (backing, batting, quilt top), baste it together and quilt as desired. Trim any extra fabric or batting even with the sides of your wall hanging.
• Cut (4) 2 ¼” x 44 strips for binding, join them into one long continuous strip.
• Cut (1) 3 ½” x 13” strip for your dowel tube, fold in half lengthwise wrong sides together and sew closed.
• Begin your binding on one of the long sides of your wall hanging. Bind until you get to the top and sandwich your dowel tube between your wall hanging back and your binding.


Continue sewing your binding, completing it as desired.
• Once your binding is finished insert the dowel into the tube and roll it up so it butts up against the binding. Whipstitch the bottom of the tube to the backing only all the way across. This will help your wall hanging to drape straight down with no bumps.

• Attach your beautiful bees and admire your work!
Hope you enjoy sewing this sweet pattern as much as I did! Happiest Sewing!

This post is part of the Betz White Sewing Collective series. Content is written by compensated contributors expressing their own views and opinions.
So beautiful!!
Great idea Rebekah! It’s really pretty!