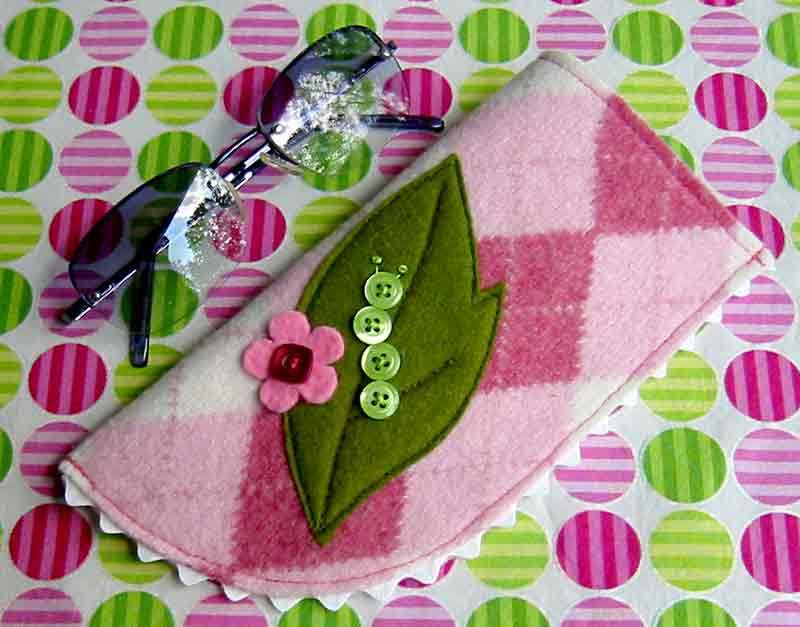
This design can be done in any color combination using whatever felt and fabrics you’ve got around. My first version was red and I used felt balls to create the caterpillar. For this tutorial, I decided to make one up with a button caterpillar instead to show variation.
Materials:
Felted wool sweater scrap, about 8″ square
Print fabric scrap for lining, about 8″ square
1/2″ wide rickrack trim, about 12″ long
Misc. scraps of wool craft felt
Double sided fusible webbing, like Steam-a-seam
Buttons and/or small felt balls
Embroidery floss
Ruler
Fabric Marker (disappearing ink)
Pins
Sewing machine (optional)
Steps:
1) Download the pdf of my pattern. (please, for personal use only)
2) Trace the outline of the case onto the paper side of a piece of double-sided fusible webbing.
3) Cut the fusible webbing out close, but not on, the outline around the sides and bottom. On the top edge, cut right on the line.

4) Place webbing side down onto the wrong side of your lining fabric.
5) Fuse to fabric with an iron following the manufacturers directions for the fusible web.

6) With a ruler and a fabric marker, draw a line 3/8″ above the top of the case to allow for a hem.
7) Cut out the lining along the outlines, including the one above the top edge made in step 6.

8) Remove the paper backing from the lining fabric and fold the 3/8″ hem allowance down across the top. Finger press into place or pin.

9) Place the webbing side down onto the wrong side of the felted sweater scrap. Align the folded lining edge with a straight-cut raw edge of the sweater felt.

10) Fuse together with an iron and cut out around the sides and bottom. (Make sure to cover with a damp press cloth and really steam it to be sure it is full fused.)

11) Trace and fuse leaf shape to a piece of wool craft felt. Be sure to use the reversed image as the webbing will be on the back of the applique.
12) Cut out leaf shape. Peel off the paper backing and fuse to the case.

13) Machine stitch around the edge of the leaf.
14) Mark the vein of the leaf with a fabric marker and machine or hand stitch the detail. Don’t worry if it’s not perfect…it’s a leaf for gosh sakes.

15) Cut out a felt flower and tack in place with a button center. I used a square button as I thought it looked nice with the argyle pattern background.
16) To create the caterpillar, stitch on 4 green buttons with embroidery floss. Add antennae with a straight stitch and a french knot. (for the felt ball variation, cut 1cm felt balls in half and glue the cut sides down with fabric glue. Make french knots for eyes)

17) About 1/8″ down from edge, straight stitch top of case, securing folded lining edge to the raw edge of the felt. The felt doesn’t need to be finished and would be too bulky if it were turned under.
18) Place rickrack along one edge of the lining to the halfway point. Allow the points to poke out past the edge. Fold in the ends and pin. Baste or straight stitch.

19) Fold the case sandwiching the rickrack between the front and back. Pin and straight stitch following your stitch line from step 18.
There you have it. If you’d like to make your caterpillar with felt balls instead of buttons, you can buy them at ornamentea. If you have any questions about the tutorial, let me know. And as always, I love to see your versions!
hi!
oh thank you… so cute!
🙂
manela
ooh….love it!! thanks for another awesome tute.
hey, i forgot to write you back, but i wanted to say, that I LOVE your new space here. everything looks so clean and fresh and it’s just perfectly matched with everything that you do.
This is a great project. Thanks for the tut. For what it’s worth, I think this is better than any of those things on Fred Flare right now.
It’s very nice. I love th animal in buttons. I ill try to finc the check felt to made it !
Great tutorial! I gave you a shout out for your beautiful blog and for your new book in an interview I just did for the Inspiration Wednesday podcast. I know she linked you from her site as well. Hopefully you will get some new traffic. Let’s talk soon.
susan
Hello, it’s so cute! Thank you for sharing! Saludos desde BCN
Thanks – great tutorial!. I love blogging tutorials.
Great toot and I can hardly wait to give it a try! Great blog and I love your stuff!!
everytime you make great things..your book will be the next book of crafting-sewing that i will buy!!have a nice sunday!!thanks for showing!!
Thank you so much for sharing! I like both color combination.
Long time lurker here. Just love everything you do. Thanks again!
Not sure if you have seen this but after your tutorial I thought you should win!
http://www.etsy.com/contest_sew_useful.php
No speak english. From Colombia.
Beautiful, super!!!
Congratulations.
What an adorable idea. My daughter just got a new pair of glasses and I know you’ll love the idea of making a personalized holder for them. LOVELY!
Hi, we love both your beautiful cases…they’re really colourful and gorgeous. We love being creative too, whether it’s sewing, baking or growing. You’re welcome to visit us at http://www.thehomelyyear.blog.co.uk
This one is my favorite. I just picked up a few sweaters too. I need to make one of these!
Thanks for sharing this tutorial.
Greetings from Spain
Great Tutorial!Thank you very much!
Love this! Can’t wait to try it out:)
Betz, you rock in so many ways! It won’t be the same as FredFlare, but I’m going to write a double entry about you tomorrow on my blog to give you some press! =)
That is so sweet! Thank you for another wonderful clear, fun project and tutorial. I want to make one. I love the buttons for the caterpillar and of course the ric rack.
I wish my thrift shops had nicer things to felt, the jersies are always blah colours and patterns but I keep looking!
Merci pour toutes ces belles choses que vous nous offrez!!
so cute
claire
What a wonderful project!!!!!Thank you so much for giving us the tutorial!!!!!!
What a great gift! I wish I’d found it before now (and didn’t have a screaming baby to contend with so I could make it!)
OMG,that is the cutest thing ever!!
Hi!
I love the final peace, but then i see the tutorial and it’s even better… the materials and all the little setp’s very clear! Thank you! (sorry my English)
I’m your fan!!!
It’s beautiful, you are really full of talent, good designer. 🙂
Love the eye glass idea. What a neat idea for a little extra gift. Love visiting your blog and got a lot of inspiration. Feel free to visit mine.
Happy Creating,
Heather
Thanks for the tutorial. I combined it with another idea from the interwebs to make this. (Scroll to the bottom of the post.)
Wow, thanks for sharing this! I think that this is a creative idea. We can also make some other pouch, not just eye glasses holder.
I LOVE your tutorials! The pictures make it easier for a learner like me.
thank you!!!
I love this! I am posting it on my blog on the 29th as a tutorial linking right to your blog.. thanks!!!
http://www.sewmanytutorials.blogspot.com
OMG! I love this!!! I’m so glad Craft Gossip featured this today! I can’t wait to give this project a try!
Thank you for this project! I have made a selvedge eye glasses case using your template. Here is my blog post about it:
http://quiltingforhappiness.blogspot.com/2011/02/selvedge-reading-glasses-case.html
Thanks again!
hello, thank you very much for your useful tutorial, my version is a phone pouch, I made it for me, my mom, and my sister. This is the link if you are interested to see 🙂
http://rikadaniel.blogspot.com/2011/04/leaf-phone-pouch.html
thank you!
so brilliant !
I love love love this tutorial. Such a cute idea! My grandma’s birthday is coming up this month (she will be 77) and this would be perfect for her! I’m pinning this on Pinterest! I would love it if you considered sharing this at my linky party this week! 🙂 Thanks. http://www.artistic31mama.com/2012/03/fabulous-fridays-5-03-30-12.html