As a kid, one of my favorite things about going to church on Easter Sunday was carrying a special little purse. Mine was round, white wicker with a hinged lid. I wore white gloves with itty-bitty flowers on them just to have something to put in the purse when I got to church. I was always such a tomboy, I can hardly believe it was me. I guess everyone likes to dress up and be girlie once in a while.
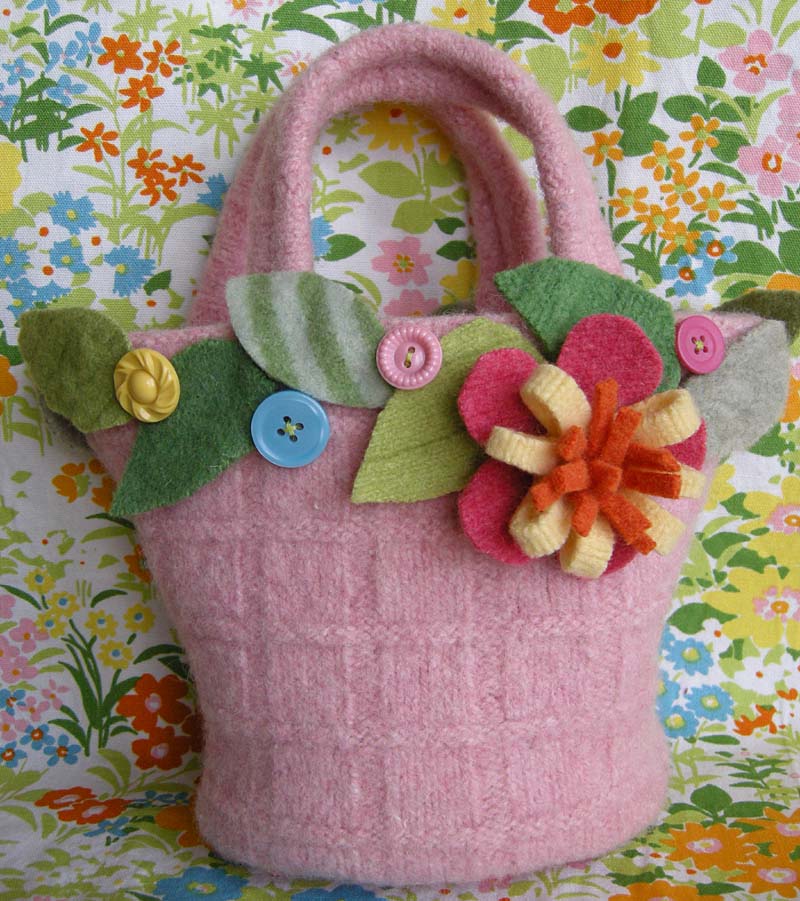
I love the idea of a spring pocketbook in felted wool. Easter, especially an early one, can be a little chilly. This mini-tote is cozy to hold yet springy to look at. As usual, I had an idea in mind for this project but kind of made it up as I went. I wanted to do something small, just big enough for gloves (c’mon, it could happen…), a small doll or stuffed animal and maybe some contraband jelly beans. (I won’t tell.)
Materials
Wool Sweater, “felted” by washing in hot water
Felt scraps (either from felted wool sweaters or wool craft felt)
Assorted buttons
Sewing Machine (optional)
Craft Glue
Needle and thread

1) Make Pattern and Cut
Using a piece of 8.5 x 11″ office paper, measure a trapezoid following the measurements above. The top width of the bag will be 10″, the bottom width will be 7″, the height 8.5″. The oval for the base should be 1″ shorter in length than the width of the bottom of the bag, about 6″. I made my base 3.5″ wide. Using your paper pattern, cut out 2 trapezoid sides and one oval base. I lucked out and found this sweet pink sweater with a basket weave look. Any sort of texture or pattern would be adorable for this. Cables, fair isle, etc. Note that a fair isle will tend to felt more firmly due to the stranding on the back. A ribbed texture may not appear to felt at all. (more on this topic to come in a future felting tutorial)

2) Sew Sides and Base
Right sides together, pin then sew side seams. Pin then sew oval base to bottom opening, aligning mid-points of oval to side seams. Resist the urge to zigzag your seam allowances. There is no need (the felted sweater will not ravel) and a zigzag will cause your seams to get all woopy. Trust me, I know woopy.
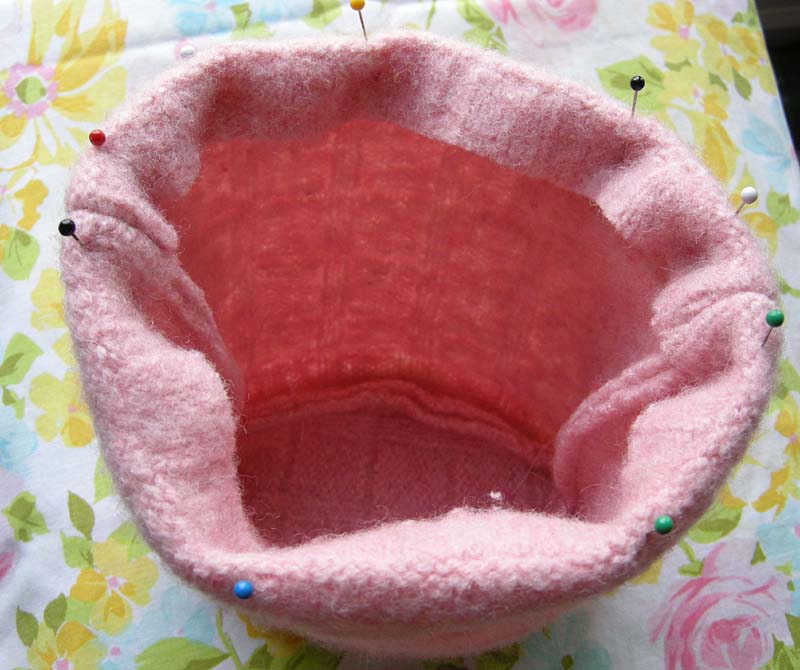
3) Hem Top Edge
Fold down 1″ around the top opening. Pin, evenly distributing the fabric. Straight stitch 7/8″ from the folded edge. The bulk and the flare of the trapezoid will cause the opening to curve out slightly giving it a cute basket-y shape. At this point, you could line the bag, if you are a liner. I’m not so much a liner. I’m a “hurry and get it done-r”.

4) Cut Straps
For double handles, Cut 2 strips measuring approx. 2.5″ x 11″. Fold raw edges in toward each other. Butt edges together firmly and stitch down the center of the strap using a wide zigzag. Stitch the full length of the strap.

(for a single handle, cut a strip measuring 3″ x 14″. Stitch as described above. This gives the tote more of a basket look)
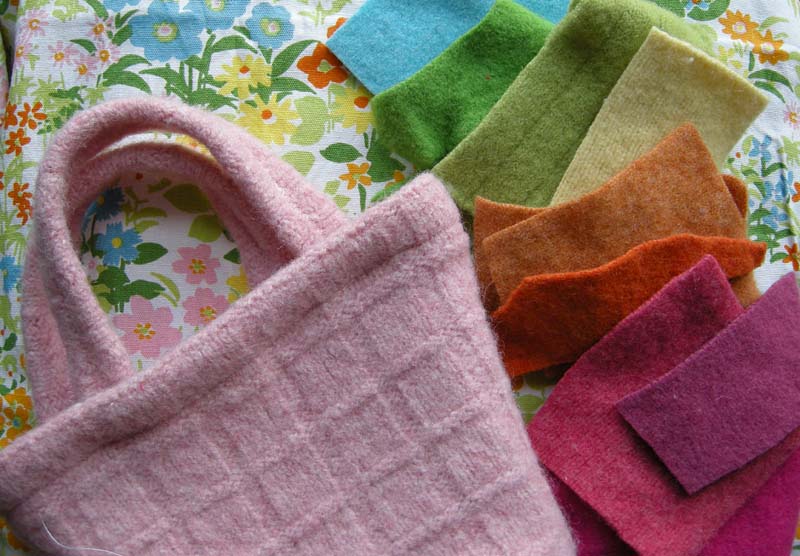
5) Attach Handles
Pin handles to the inside hem of the opening, making sure they are spaced equally from the side seams. Stitch along the previous stitch line to secure. Gather some bright sweater scraps together for embellishment.

6) Add Leaves
I was going to make flowers all around the edge, but decided to start with leaves instead. (Why do I love pink and green?) The tote is pretty small and softly constructed. I didn’t think it would hold up to a whole bouquet of flowers around the edge. Cut some simple leaves from scraps and glue into place. Pin until dry. (There will be plenty of hand sewing to come. Go ahead, glue the leaves.)

7) Make Flower Pieces
For my flower, I pretty much made my standard brooch. Cut scraps into strips. To make loopy petals, cut 2″ x 6″ strips, fold lengthwise and sew edge (yellow and dark pink above). For straight petals, cut a strip 1″ x 4″ (orange). Next you’ll snip the strips every 1/4″ to make petals.

8) Roll Petal Strips
Roll the strips up and hand stitch the base together catching all layers. Wrap with a second color strip and stitch. For the flower on this tote I cut a daisy shaped base and glued the rolled petals onto it.
(For more details check out my felted brooch tutorial or the video podcast demo from CHA)

9) Finishing Touches
After making several flowers, I chose the one I liked best for this project. I sewed my flower in place then added a few vintage buttons for an extra dash of color. I like the different textures of the fuzzy felt with the smooth buttons. Besides, it’s nice to have something pretty to look at when you’re sitting in church all hopped up on Easter candy.
Speaking of hopped up, do you recognize the little bunny friend from last year? Hope you enjoyed this tutorial and please let me know if I’ve left something out.
Thank you for this tutorial – I have bookmarked it so I can read it properly later when I am back from picking up the children – it looks lovely! Lucy x
Loverly my dear… got a box ready to send your way!.. I will make my post office run this afternoon.
Maddie
I found you blog the other day and just love all the things you make. This little bag is adorable. I need to find some wool somewhere.
I love that bag, I need to make one of those for myself!
Adorable tote and great tutorial!
What a great tutorial. The spring tote looks lovely!
that is adorable, can i just ask, when you zig zag stitch the handles, do you do that by hand or on a sewing machine?, which would you recommend?
thanks : )
you’ve done it again!! it’s adorable!!
Oh, that is so sweet! If I wanted to knit and felt that tote, is it just stockinette stitch and purls?? I can’t really tell by the picture but I know I don’t have a sweater like that! And that just totally makes the bag. I LOVE that!
Thank you for nice-tote-tutorial.
I love your blog and your creations.
My name is Cecilia, I’m from Sao Paulo, Brasil, and I live in Idaho with my husband and my lovelly pets.
Thank you again.
[email protected]
Hi Annie,
Hmmm, I don’t know if I’m qualified to suggest how to knit then felt something! 🙂 I looks to me like a 6×2 rib, then two rows of reverse stockinette….
Good luck!
Hi Lucky Kate,
Yes, zigzag stitch the folded handles up the center by machine.
Betz
That bag is gorgeous. You’re so talented!!!
So pretty!
That is too darn cute! Love it and thanks for the tutorial.
Pretty bag! Thanks for sharing the tutorial. Now I just need to find some wool sweaters.
Oh wow! I am so going to do this one … and soon! 🙂 THANK YOU!!!
It’s so lovely, thank’s for sharing the tut.
Saludos desde Barcelona
Betz – I am a friend of Christy’s, and I have been meaning to tell you I think your stuff is great! This bag is another cute idea.
You keep outdoing yourself, your things just *need* to be made. Thanks for sharing your talent and your projects with us all.
The purse is adorable!!! Thank you so much for the tutorial.
Come see my wool felt picture on my blog… I blame or give you credit for all things felted. But, I love the feeling of sewing on felt… I just ordered some wool felt online. I am pushing us out of the house with my piles of felted sweaters. Where do you go with them all?? I have so many that didn’t felt well… and I’m so cautious about the labels.
Anyway… you opened a whole new world to me and I thank you!
Joni
So adorable. Thank you for taking the time to share & post this, Betz. You are so generous with all your wonderful creativity!! 🙂
That has to be one of the cutest things I’ve ever seen!
Wow! A lovely bag and a great tutorial. I will definitely try this.:)
Thanks!
thank you Betz!! I just love this!!!! I would love to make these for my girls for Easter, but I hacen’t had any luck finding wool sweaters!!!! We don’t wear much wool in the south! I got a few on ebay, but I don’t have time for that for this project. Any suggestions???? Thanks again for sharing this, I think it is simply adorable!!!!
Thank you so much for the tutorial. It’s unbelievably cute and I can’t wait to make one!
This is adorable! I wish my grown-up girl was still little so I could make her one 🙂
So, so, cute! Umm, do you have an Etsy shop to sell your fabulous creations?
OMG that is so cute! You are too good! Thanks for the tutorial!
Hey Yummers, check out the discussion over at the flickr group to read about storage and hard to felt sweaters.
Hey Vicky, please check out the sidebar of my blog to find my etsy shop!
I read your blog everyday and just had to post. I LOOOOVE the cute pink purse!!!
Everything you do is so lovely, but my jaw dropped on this one. Now to find an appropriate sweater and make a big girl size one!!
Thank you, thank you! (looked great on craft too!)
so fun! thank you for this – i love playing with felted sweaters, too.
Oh that is just TOO cute! Can’t you just make me one and send it to me??? PLEASE!!!
http://flipfloppingmamma.blogspot.com/
Adorable, I have placed a link to your tutorial on my blog.
Thank you!! This tutorial is just darling! What a great excuse to go thrifting this weekend!
I love your blog and visit quite frequently! You are such an inspiration.
This is so cute – my mom would love this. I’m a huge fan – first time posting though. I recently purchased your book and I just love the projects in it. Thanks for sharing your gift with us.
Your spring tote is so pretty! Thank you for such a great tutorial!
Betz, are you going to the Country Living Mag/seminar on March 15? I’v been chosen to pitch my product and was hoping to see you there! Lisa
O, I love your newsletter…..
Hi Betz 🙂 I’m a jewellery designer from New Zealand and have been recently dabbling in handbags. I wanted to try felting, googled it, and found your blog – thank goodness!! Your tutes and preddy liddle things are so fantastic! Just love your stuff. You have me all enthused to give felting a go now – thanks so much for the inspiration 🙂
beautiful blog.. I really wish I knew how to sew to try one of your lovely tutorials.
This is so adorable, you are so creative!
just darling.
This is my first visit. I love your beautiful blog. The Easter tote is wonderful! I’m adding you to my favorites.
Love that little bag, and the bunny…is there a pattern for the bunny??
Hi Annie,
Yes, there is a free pattern for the bunny! Click the “bunny friend” link in this post or check my blog’s right hand side bar for it in the list of tutorials.
Betz
That is so cute! What girl wouldn’t love to carry that to church on Easter? Fabulous!
Not only is the purse adorable for church, but the single handle (more basket-y) purse would be perfect to use for an easter egg hunt! Thanks for the tutorial!
Thank you so much! My youngest is turning 10 on Saturday and this the perfect gift..beautiful!!
Laura
great tutorial, I can’t wait to make this little purse, thank you for sharing,
I also have lots of felted sweaters I need to use, make room in my sewing space
I made one this afternoon while home sick and I must say it made me feel better making this cute, simple bag. My daughter is excited to use it at the Spring brunch, too :o)
ok Beth, let’s see it! 🙂
Thank you for your great tutorial. Absolutely gorgeous. I think I’ll link to it in my blog, if that’s ok?
This is so cute! Thanks for the tutorial!
Thank you for the tutorial – I’m going to get going on this and make this for my granddaughter’s Easter package. It’s simply stunning!
Spectacular! Just SO beautiful!
I just adore this tote, thanks so much for the tutorial.. I can’t wait to try it out myself.
O.K. I am sure you’ve been asked this before….but I was wondering how you store all your wool sweaters. I’ve been gathering them for quite some time now, and wondered how to deal with this on a practical level. No, I wasn’t expecting you to be neat and tidy, what good artist is? But you have to deal with the bulk some how! Thanks.
Oh how adorable! I always had a little handbag for church. When I was very little it contained a “church doll” that was entirely made of soft fabric so that it wouldn’t make any noise if you dropped in on the floor during the service!
It’s really adorable and perfect for carrying Easter bunnies!
I love your bag! I’ve only made one felted bag, but I think I’m up for the challenge. Great tutorial. Thanks.
Hello – your site, your photos, your crafts and your tutorials are just wonderful. Also your generosity.
Laurie in Virginia
hey sweetie!! this is TOO CUTE!!!!!
Very cute! I may have to make one of these.
This is beautiful! It reminds me of the pink woven basket style purse I had when I was about 5… Jan H
Loved the little bag! Decided to try my hand at making it; used a cable knit felted sweater that was not quite the thing for making a spring handbag!(way too limp!) But it really was too cute not to do something with! After putting on my creative thinking cap–I made an easter basket to display my easter goodies in!(to add form just added a handleless basket!) BusyBren
What a great tutorial. I whipped up one of these in a few hours yesterday and I love it (I did make it slightly different to fit the sweater I was using). I’ll post photos on my blog later…looks really cute with a kitten in it!
I know why I like pink and green together: http://jmday.com/?p=108
I just love this so much that I made one today!
A very fun project. It is not as finished looking as yours but I like it anyway. I will be making more of these!
I just found your blog the other day and I love it.
Just wonderful. I’m hooked on the idea of learning how to felt and this just makes me want to learn all the more.
What a beautiful blog filled with such wonderful projects.
Everything is such a pleasure to browse. I’ll be back for more.
I am so excited to try this idea! Are the scraps you use felted sweaters as well? and does this fabric not fray? It looks so simple! thank you for your inspirational posts! cheers
*squeeeeeeel*
This bag is so cute – I can’t wait to hunt down a sweater and get the washer “fired up”. (Just as soon as I make a couple of cake plates from sundae cups and clear plates to display some of my paper cakes…)
Charlotte Lyons posted a link to your blog today, and I couldn’t be happier to have found you. Your work is fabulous.
Happy Spring!!
Andrea
Very sweet little bag. I am sure any girl, big or small would love this!
Thanks!
Thank you for the WONDERFUL tutorial!
I have been getting very interested in trying to felt wool sweaters and create something.
~elaine~
Betz! What a great project! Thank you for the tutorial!
I made this as a present for my sister who just loves it! (You can see photos on my blog)
Thank you, thank you, thank you!!
thank you so much. the bag is so cute, and i sure can recycle my sweater. i hope this will motivate me for this project. thanks again. great, great idea.
C’est vraiment très joli :-)))).
J’aime vraiment beaucoup tout ce que tu fais, bravo.
Tourlou.
Sylvie.
your fun projects are too adorable – I love this bag – maybe my nieces will actually get an Easter present from me this year. What to do for my nephew? Can’t really give him a cake stand, though I want to do that too… hmmm. Girls are so much easier to make things for than boys. Great idea on the remaking of two shirts into one bigger one!
thanks,
Maureen in St Andrews by-the-Sea, NB, Canada
I love that bag. It is awesome and so so so so cute.
Olá,
Adorei a bolsa de feltro.
Um grande abraço
Terezinha – Rio de Janeiro – Brasil
what a sweet purse..thanks for sharing
xoox
((((hugs))))
Maggie..
waving from cold snowy southern ontario canada
Obrigada!!!
*.*
Totally AWESOME!!! Thank you SO MUCH for sharing this tutorial with us! I can’t wait to make one—I even already have wool and even some sweaters! 😀
“Wow” was the first word that came out into my mouth… That’s so stunning dear and by looking at that cute mini tote bag really inspires me to create a new one…
this bag is very nice!!! congratulazion!!
monica (italy)
This looks awesome..I feel like making one immediately..One thing, though- can it be washed? And can I make a similar one from old jeans? ’cause I don’t have felt handy right now….
Hi Sonia,
You can wash this by hand and lay flat to dry. I’m not sure how it would look out of denim, I haven’t tested that pattern for that.
Betz
so darn cute… thank you Betz once again you have inspired… love you!
I do a lot of feltiing so this is right up my alley..
I also had the little gloves. I loved Easter morning…
THanks for the directions. I have 4 granddaughters!
This is adorable and a great tutorial!
Thanks so much!
Hi Betz,
It was interesting to read your comment about being a tomboy – I’ve always found tomboys to be the most attractive women!
Surfing onto your site today reminded me of easter when I was a kid!
Ben
Beautiful! Beautifull!!!!
Très jolie sac trop choux, merci pour les explication
j’espère que tu comprend le français.?????”’
bisoussss
So cute! I’m Jewish, but I have a 7 year old cousin who will love it.
And I’m also a “hurry and get it done-r”. 😉
What a wonderful blog, thank you so much!
OMG. If that isn’t the cutest thing. <3
hello..is it wool sweater same with wool felt?can i use wool felt to make this bag either?
tq
Oh I love this tote! Very classy yet fun! So glad i stumbled upon you site here…I will definitely come back! 🙂
I definitely am not a sewing kind of gal, but loved how easy this looks to make! Loooooove the flowers!!!!
Oh My! It’s so cute, thank you so much for the idea and tutorial.
Oh My I just Love all
Thanks ! YOUR the Best!!!
Hermoso tu trabajo, felicidades.