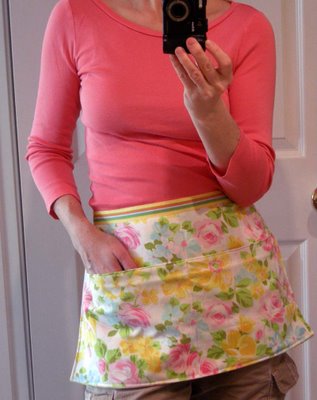
TEN minutes to make this…no kidding. All you need is a pillowcase, about 2 yards of ribbon and your sewing machine.
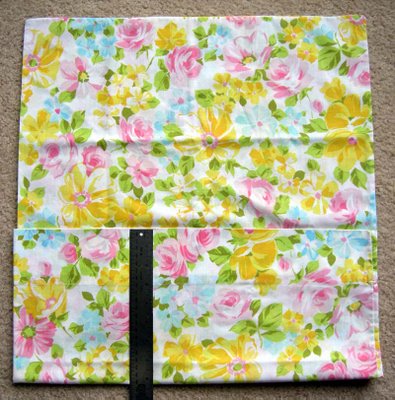
Step 1: Lay out your pillowcase. Fold up the bottom edge 8″. Top stitch along the folded edge at 1/4″. (The stitched edge will become the top edge of the pockets.)
Step 2: Turn the pillowcase over and fold the bottom up another 8″. There will be 3 layers of pillowcase.
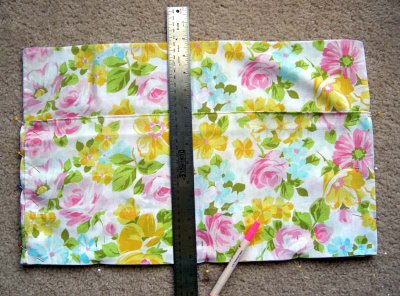
Step 3: Pin the layers together and top stitch around the sides and bottom edges. Mark a line down the middle of the front pocket, pin and stitch.
Step 4: Lay about 60″ of 1″ wide ribbon across the top edge of the apron centering it on the length of the ribbon. Pin in place. Topstitch ribbon at the top edge, bottom edge and across ribbon at sides of apron.
Step 5: Tie it on, use it, put stuff in the pockets, look cute…you know the drill. 🙂
Aren’t pillowcases a blast? Coming up later this week I’ve got ANOTHER pillowcase project for you to be posted over on Craftzine. I’ll give you a shout when it’s up!
Meanwhile, I love this pillowcase tote I stumbled across over at polkanuts. There’s also two pillowcase projects in Sewing Green, the Easy Breezy Skirt and the Girl’s Easy Breezy Sundress. There’s even a whole book on pillowcase projects called Craft Challenge: Dozens of Ways to Repurpose a Pillowcase. I haven’t seen it in person, but I read a nice review of it by Diane of Craftypod.
This work by Betz White is licensed under a Creative Commons Attribution-Noncommercial-No Derivative Works 3.0 United States License.


fab.. now if only I had a pretty pillowcase… and a slender waist too, but I’m thinking that is a bit of a pipedream!
You do the “look cute” thing quite well. Very appealing project. Love the “10 minute” part!
Super cute! They’d be spiffy for craft shows…. I can also imagine my kids wearing one for their crayons too when they’re at the easel. (without the flowers of course since they’re boys and I wouldn’t want to scar them too much).
Ha, great idea! I just made some aprons out of dish towels, but I love how you can add a big no-fuss pocket to pillowcase aprons! Wonderful idea, I will definitely try it out!
Hi Isa,
You could totally use a dishcloth for this design. The way it folds, the front of the dishcloth would still face outward, if that makes sense.
Betz
Super cute! Love the quick and easy.
Thanks for sharing. Now that I am a sewer…
Great idea! Thanks for the tute!
Alright…you said you had a ‘pillowcase’ idea coming but you outdid yourself here. I love old pillowcases but I tend to leave them behind because I haven’t come up with that perfect idea. Aprons are {one} of my things and short utility aprons are a fav. This is a perfect idea that I will definitely try! Here’s a recent one that I made ~ http://tinkerverve.wordpress.com/2009/05/08/quilted-apron/
Thank you for the idea!!!!!
Wow, this is so cute! What a great way to showcase one of my grandmother’s cases, I love it! I’ll be linking.
Nice idea. I’ve been making very simple pillowcase totes for a while now and love making something that gives a thrifted item a new lease of life.
Such a cute idea!
Really cute idea!!!! It’s so nice…
I love it!!
Wow, that’s ingenious!
Oh, my goodness . . . flashback! I had the exact same sheet set when I was young. In fact, they’re probably still in a drawer at my Mom and Dad’s house!
Wow thats great 🙂
that is super cute, betz! and i always like a fast project – they are so satisfying!
I purchased that exact pillow case at goodwill, knowing I’d find a great idea for such a sweet print! Wonderful idea, Thanks!
Simly fabulous!
Cheers.
Julie
This is the best!! I just bought a new sewing machine and have been itching to try something other than sewing on paper.. Thanks SO much for the tutorial 🙂
Totally adorable and very pretty!
Wow, I love this! If I had a sewing machine I’d be whipping these up for gifts.
🙂
Thanks for the tutorial and other pillowcase craft ideas. I have several cute pink floral vintage pillowcases I have been wanting to make into aprons.
What a gorgeous idea!!! I love it !! Thank you for sharing it!
Love the apron and the shoe bag ideas! Really neat that you can use little things around your house. I might even make an organizer for my sewing repairs with space for scissors, needle and thread etc. My sewing room is on the third floor of my house, so I could keep this handy for non- sewing machine repairs. Thanks for sharing and getting the creative juices flowing. Check out my blog!
http://sewmarysew.blogspot.com/
Genius! I’m going to be making a ton of these–they’ll make great gifts (and I live by the belief that a girl can never have too many aprons).
This is really fabulous 🙂 Thanks!
This is genius! I will have to try this out during my kids sewing camp.
Thanks for the inspiration!
PS – I just got your book and am loving it.
This was my very first sewing project (last night) in order to learn how to use a machine! I’m signed up for your bag making class at squam and figured I should learn beforehand. I loved it! It was so much fun to make! Thanks for the project. Looking forward to meeting you.
so very cute!
I just bought some great pillowcases at the thrift shop with the intention of making some aprons out of them. I had planned on doing a slightly different design, but this one is very cute. I may have to try it too.
I just found your blog and I LOVE it! I love the pillowcase apron. Had some odd pillow cases, no two alike, and decided, “That’s it!” On solid color cases I went to my trim scraps and found scraps of rick-rack and lace to add!
Yours is a unique idea and thanks for sharing!
Cajun Anne
glad i bookmarked this! just made one for my first craft show this weekend 🙂 thanks for sharing, and inspiring!!
Bonjour je découvre ton blog et j’aime ce que j’y trouve alors tu m’y verras régulièrement
L’idée du tablier est géniale
Merci de la partager avec nous
Gros bisous
Béa
Wow I made one of these after not being in front of sewing machine in 3 plus years! Thank you so much for the tutorial– it is amazing! And my apron is fab!!!
I’ll definitely be making one of these! thanks for sharing!
As an advise columnist for J&O Fabrics, I am always getting emails for craft ideas. Pillows are always great for turning into quick bags especially for laundry or linens. Your apron idea is a quick and easy one to add to the list. Thanks for sharing!
How big is your pillowcase for the 10 minute pillowcase apron?
Anett,
It’s a standard size, about 20″ x 30″.
Thanks for sharing this quick and easy sewing job. The apron is so handy, I wonder why I didn’t think of it myself!
Cute Idea!!!!
Now I need to make a pillowcase. I love the easy project and pillowcases are my favorite to make.
I made two of these last night…so easy! Thanks for the tutorial!
Lorie
I love this, a great beginner project, pinned and I see my girls making a few of theses this summer!
This is super cute…but not the best for those that cook AND eat a lot 🙁 maybe eat more than cook… trying to figure out how I have accumulated an extra 60 pounds over the last 3 years… I will give in one day and stop being scared to cut fabric I have and I will make something… I would like a feminine apron, one that covers upper body also, as I am that messy when tasting things… Thanks for sharing!!!
That is so cool. I have tons of pillow cases but no aprons in my house. I love how good it looks too. The little pockets in the front make it really cute. Thanks for this I’m going to try and make one.
Finished my first one, and I’m in love! 60″ is a LITTLE too short for “normal” waisted people though. I’m going at LEAST 65″ from now on, probably 70. Thanks so much for sharing!!!!!