So, are canvas totes the new T-shirt or what? You know, as a promotional tool. Go to an event, come home with a canvas tote. I’m sure you have acquired a bunch like I have. I use them for groceries or library books, but…meh. BOOOOR-ing.

I always think I’ll whip up a few cute printed totes instead, but I don’t have a lot of time or patience for *sigh* making the lining or *ugh* making the straps all precise and what.ev.er. Anyhoo, I’ve been dying to put a little brainstorm I had to the test: Use a ho-hum canvas tote as the lining AND the straps, and just add the cute print to the outside. WOOT!
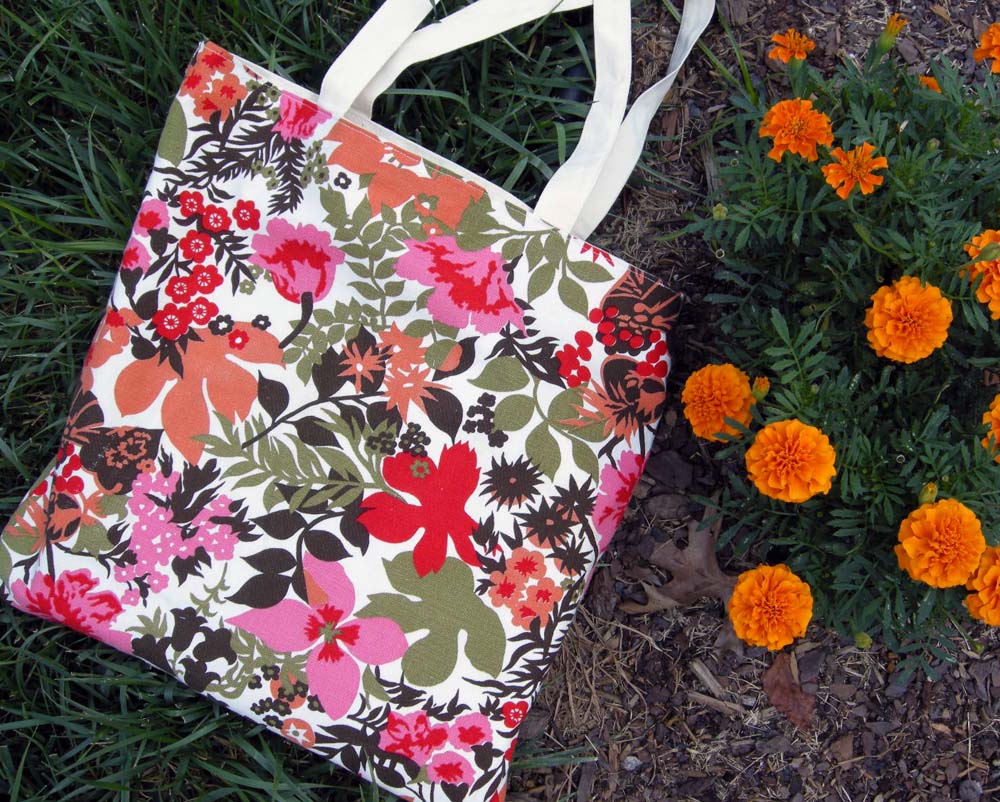
All you need is a canvas tote and an equally sized piece of fabric. I used a thrifted tablecloth that’s been waiting patiently in my stash to be reused as something.

1) Turn the ready-made tote inside out and place it on a piece of fabric folded back on itself. Align the bottom of the tote with the fold. Using the tote as your template, cut the print fabric along the sides and across the top, leaving an extra 1/4″ of fabric extending past the top of the tote.
2) Put the tote aside. Refold the print fabric with right sides together and stitch the side seams. Press the 1/4″ extension across the opening to the wrong side.
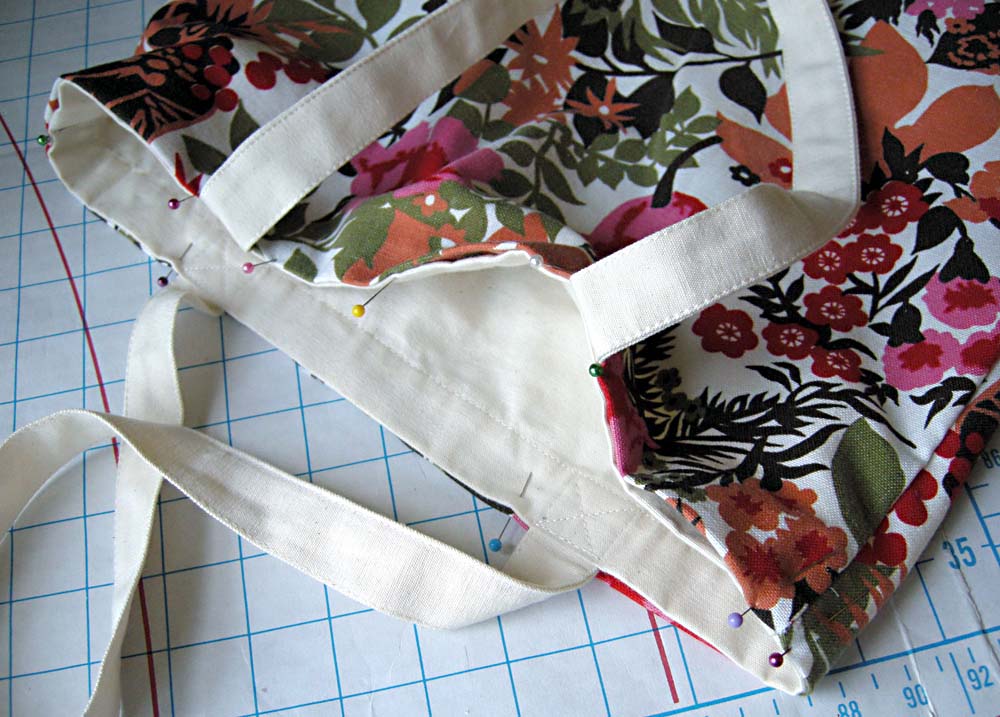
3) With your canvas tote “liner” inside out, slide your print “outer” tote over it so that wrong sides are together. Pin the pressed hem along the top edge of the liner.

4) Topstitch around the opening. Smile to yourself because you are done.
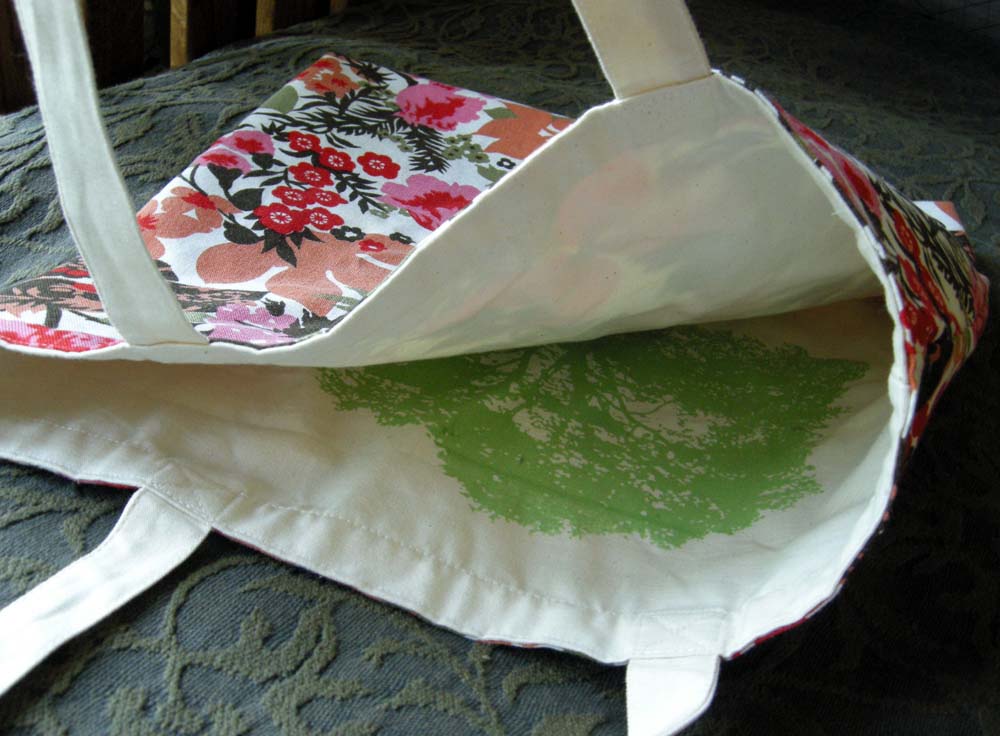
Not only did you save a lot of time, but you have a nice finished lining. It would’ve also been very easy to add a pocket to the inside before attaching the outer tote. (One more tip, if your fabric has a directional one way print, you will want to cut out 2 sides and seam the bottom in step 1. Otherwise your print will be right-side-up on one side and upside-down on the other.)

Hooray for tote tricks! I can’t wait to make more!
***UPDATE: Thanks for your responses! Just wanted to mention that if your ho-hum tote has some dimension at the bottom, you can “box” the corners of your outer fabric to match the depth and make it fit better. Here’s a link to a tutorial that shows how to make box corners. Also, if you want to show off your “tote trick” pics, join the “Show Us How You Sew Green” Flickr group for a chance to win a craft book! Visit the STC Craft blog for details about the giveaway.***

This work by Betz White is licensed under a Creative Commons Attribution-Noncommercial-No Derivative Works 3.0 United States License.
This is a wonderful idea. I bought oodles of plain canvas totes ages ago and have been using them for years. Initially, I dyed them to revive them a bit, but this may be the next stage to continuing their life and usage. Thanks so much for the inspiration!
LOVE IT!!! Now where did I put all my canvas totes?! I’ve got thrift-store sheets just dying to become a funky new tote!!
CHEERS — Sonja
Cute! I tweeted about it!
great idea.. i’m so gonna make one!
You are freakin’ brilliant!! Seriously. I love that bag! You and your repurpose crafts are making my “Must Make” list reaaaaaalllly long!!
I love this is so cute! Creat tablecloth find too!
You’re a genius. Now you’ve got me thinkin’, too.
Great idea! Love it! Now I know what to do with the plain bags you pick up along the way……
Fantastic tote trick and so simple!!! I have lots of boring totes waiting to be spruced up! SWEET!!
So smart! I love the table cloth design too!
Excellent idea!! Will definitely be giving this a try!
And it’s reversible! So smart!
Hey KV,
Ha! I didn’t even think about the reversible part, LOL!
Betz
I love eco bags, fantastic idea. double side.
Kisses.
GENIUS! I hate the ugly bag, but they are so practical that I use them anyway….can’t wait to revamp mine!!
This is a really great idea!
How clever! I often pass on the free totes, but not anymore.
Oh that is so smart! I will put this in my idea file for future use for sure!
Wow! Fabulous!!
Lovely!
I am kicking myself right now!!! I just threw out a handful of those totes. Why did i do that?
I am seriously thinking of rifling through my garbage right now. Ewww, we had fish for dinner last night.
What a great idea — I can’t wait to try this! Thank you.
— Jodi B.
you are just too clever! and kv seeing the reversible use, very good. i love this idea! and i love the idea of using a recycled tablecloth, i see them in the thrift shops and always wonder what to do with them…now i know!
thanks, betz!!
:o)
puglette
simply. brilliant!
Brilliant!! I’m digging through my fabric right this very minute!
I am so doing this! What a great idea! Thanks!
Brilliant of course!
sooo good!
Great idea. Looks very nice. Thank you for the tutorial. 🙂
So clever! Thanks a lot 🙂
What a brilliant idea! I’ve been meaning to make some cute totes, too, but have been procrastinating for the same reasons. Now I can proceed knowing that it will take a fraction of the time and work! Thank you!
Genius!…I LOVE it!
xK
I am so making some of these! Teachers get tons of totes. I think I will start with my lunch bag sized tote! Will there be a flickr group for these? Thanks for sharing your great ideas!
What a great idea! Now just let me grab those canvas totes out of the cupboard and off we go….
One bag done, many more to go….Check out my blog for my results (http://thejollybee.blogspot.com). I bought your book too. It’s great. Thanks.
– Jodi
Perfect!
What a GREAT idea! I’m so going to do this!
Hello from Uzbekistan!!!
Could you visit my blog http://qoshni.blogspot.com/, in order that the flag of your country, will be added to the index of my visitors?
Thank you for your support.
Good morning,
Love what you did with them.
Now they rock!
~ Gabriela ~
Great idea, and so simple!
Awesome idea and so easy to do too!
b.r.i.l.l.i.a.n.t. I’m shaking my head because it’s so simple yet I never would have thought of it…. thank goodness there are folks like you out there who help us “squares” think outside of the box!
How clever. I am going to definitely do this!
Whao very clever!!
Great idea, Betz!
Beautiful case Betz, I love form this type consuminderen. Itself uses I these piles up for binnenzakken of my pantalons i.p.v nijlon.
Very cute! And if you don’t have a piece of fabric big enough my girlfriend puts a big pocket over the logo on the outside of the bag to pretty it up and add functionality! 🙂
Those who wish we were so clever salute you!
Fabulous idea. I will be copying it. Thanks for inspring.
ooooo thats very clever! well done!
Love the idea!!!
what a cute idea. And so easy!Love it.
Brilliant, Betz. I’ll be trying this. Love your blog, too!
GENIUS!!!!
ROFL I just told my hubby, about a week ago, that I needed to do this to my reusable Walmart bags. I keep getting eye balled when I tell them that I bring them with me lol I love your table cloth, it’s soo cute 🙂
What a great idea! This way your tote is sturdy and has lots of body without have to mess about with interfacing, which I hate [and so does my machine. Or wait, that might be because I keep fusing the interfacing to stuff like really thick duck cloth.]
What a great idea!
Also, I do the “Inspiration Posts” over at Wardrobe Refashion, can I link to this post over there?
Hi Jessica,
Sure you can link to this over at WR, thanks!
Betz
*Doh!* Of course — what a great idea! I really don’t like carrying promo totes, and the reasons you list for not whipping up new ones may as well have come from my own [lazy?] mouth. 😉 Thanks for the great tip!
Now to see if I have any boring old bags lying around….
such a fabulous/easy idea. I feel like ‘how did i not think of that??’ thanks so much for sharing!!
I’ve added exterior pockets to cover logos before, but I LOVE the idea of flipping the bag! I’ve gotten a bajillion promotional totes over the years, but who wants to feel like a walking billboard?
Thanks for the great idea!!!
wow, brilliant.
Whoa, what a great idea for all those less-than-adorable free totes! I love it! Thanks so much for sharing your genius, I’ll be linking.
O.K. Betz,
I went ahead and joined your flickr group, and I hope I win. O.K. I really really want to win.
Thanks for inspiring us.
Fabutastic!
I’m all over that like a rash! I have heaps of material, and lots of craptastic totes!
great idea. may have to try this.
Love the idea! Will duplicate for sure! 🙂 Cheers, Julie
This is great. LOVE IT! Think I’ll try one of these this weekend.
This is the perfect time for me to see this, because I am planning to make totes for the kids for their after school activities. Life’s to busy to all fit in one backpack anymore, this is a great idea!
Yep, this is great! A nifty way to update the grungy grocery bags I’ve been using. Thanks!
That is stinkin’ brilliant! I can’t wait to get my hands on some totes!!! Apparently I need to go to some conventions or something as I have no canvas totes!
What a great idea! I have so many of those freebies but I hate to throw them away cause they are usable…but ugly. Thanks!
beautifull!!!
I’m going to add my kudos for such an inspired, but simple, project–your ideas are always the best. Thank you!
Ummmm, can we say fabulous idea! Of course I couldn’t resist adding this to our link luv roundup today.
http://www.luvinthemommyhood.com/2009/09/link-luv-roundup.html
Thanks for another wonderful project!
i love this idea!!!!!!!!!!!!!!!!!!
Thanks 4 sharing. found u from the motherload blog.
Traci
Now I know why I saved all those bags!
Sooooo smart!!!!! Thanks for sharing!
~Julie
omgosh, what a great idea. I will do this….once I get more giveaway totes….I gave all mine away!!!!
Brilliant! Can’t wait to try this! Thanks for sharing.
Betz, You are so completely brill. I was just pondering how to repurpose the kajillion “conference” totes I have, for eco grocery shopping.
Thank you for posting this inspirational tutorial!
The bag is very nice, a very original idea.
mireia.
This is so sweet and simple!
My 12 year old daughter and I have an wee Etsy shop. This will be her first real bag! Also great to do with schoolchildren or as a afterschool project!
Love it…Marijke
http://www.sweetandsimplestuff.blogspot.com
very nice your idea! I add it on my blog! but is in italian, I’m sorry…
http://chebirba.blogspot.com/2009/10/riciclare-le-borse-da-spesa-di-tela.html
Great minds think alike! I did this with an old t-shirt and a conference bag. I love the floral tablecloth. Why can’t I find anything this cute at my local thrift stores?
I’ve wanted to cover a tote bag since you first wrote this post and I’ve finally been able to do it! I bought some gorgeous fabric (didn’t have anything sturdy enough already) and have just covered a v boring old tote, see the piccie here http://good.ly/t3hlh
Thanks so much for the tutorial x
Fantastic idea! I’m going to try this!!
Now I’ll be excited when the love of my life brings home the “stuff” from his conference. I usually cringe and send it all to the the garbage.
This is a wonderful idea. I bought oodles of plain canvas totes ages ago and have been using them for years.
Betz, You are so completely brill. I was just pondering how to repurpose the kajillion “conference”
someone on ravelry shared this link and I’m THRILLED to have it… thank you thank you thank you… once again Betz, you rock my world!
I read your post and went and covered one of my tote bags. It advertised a store so I never used it, but didn’t throw it out because it was very well made. Now it’s my favorite tote! Thanks for posting this brilliant yet oh so simple idea. Love it!!
Awesome! I love your books. You have really inspired me by your creativity! 🙂
~Jen
I just made this in like half an hour! I LOVE IT!!! I am going to make 3 more.
Beautiful tote! Love the floral you have used. Where did you get it from and which designer is it? Cheers, Sasha
I used a table cloth that I found at the thrift store!