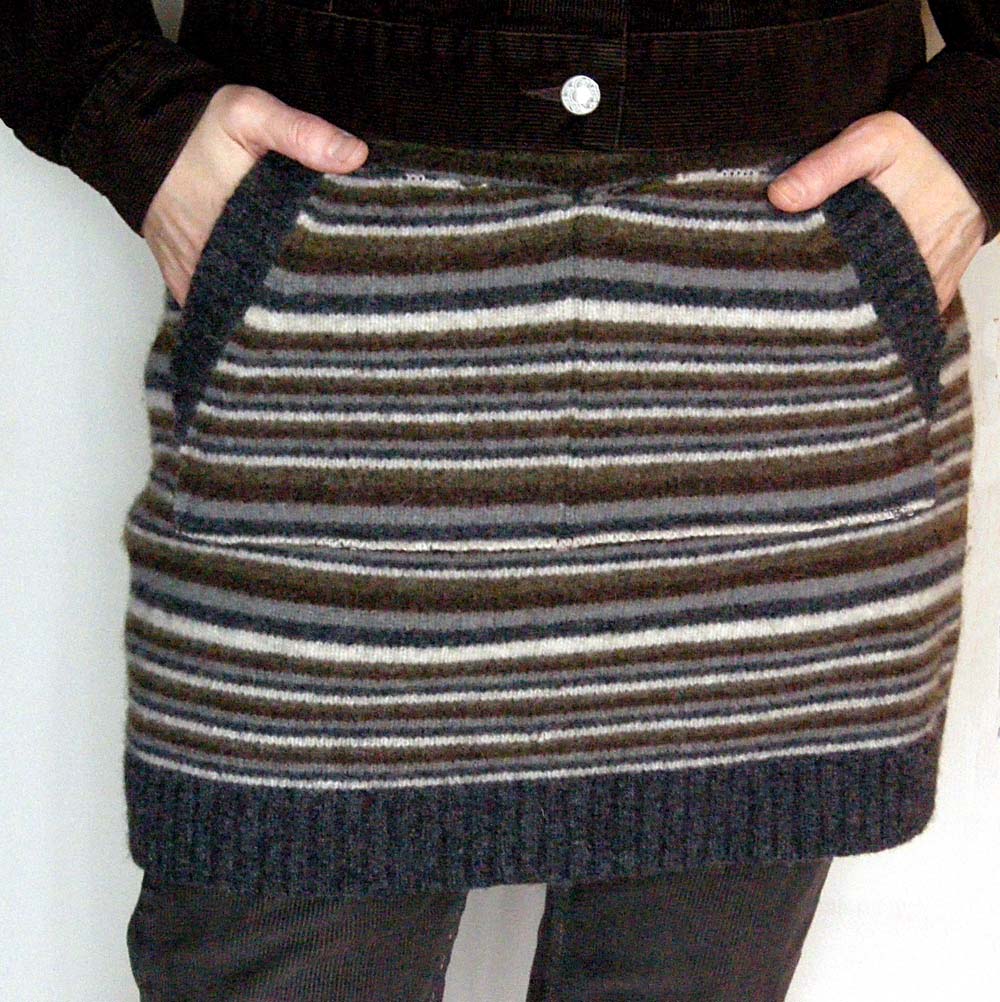
Last week I was sitting at my computer freezing my butt off when inspiration hit: I need a Snuggie for my hips!
And that lead to my *invention* of the Hip Huggie™! Bun Warmer, Heinie Heater, Hip Cozy…whatever you call it, it works like a charm. This is a fast and easy way to repurpose an old sweater and stay warm this winter. I designed it to be worn over jeans, low-rise or otherwise, plus I added a kangaroo pocket in the front for easy hand warming!
What follows is my quick and dirty tutorial documented with sub-par photography, thanks to the chilly, gloomy day that it was.
Materials:
1 felted wool sweater*, preferably a Men’s large pullover
1/2 – 3/4″ waistband elastic
Thread
Tools:
Fabric shears
Straight pins
Bodkin or large safety pin
Sewing Machine
Fabric Shears
* for How to Felt a Sweater, visit one of my very first blog posts from 2006!

1) Cut the sleeves off of your felted wool sweater and put them aside. Next cut open the shoulder seams and turn the sweater body inside-out. Try on the sweater body by stepping into it and holding it so that the bottom ribbing is placed where you would the “hem” of your huggie to be. Mark the top of the sweater body at your waistline with a pin. Step out of the sweater and lay it flat on your work surface. Cut off the excess sweater about 1″ above your waistline pin. (Save the top scraps for the pocket!)

2) After you’ve trimmed off the top portion, try on the sweater body again, this time pinning the excess at what are now the side seams. Be sure it’s still inside-out. The width of this sweater was good for me around the lower part but I needed to bring it in a bit at the waist. Pin, take it off and then sew along the lines that you pinned (shown above in pink). Trim away the excess with fabric shears leaving a 1/4″ seam allowance.

3) Still inside-out, fold down 1″ for the waistband casing and pin. Topstitch around the casing, 1/4″ from the edge, leaving 2″ unstitched. Put one end of the waistband elastic onto a bodkin or large safety pin and thread it into the unstitched opening and around the casing. Try the sweater on again and pin the ends of elastic together at a comfortable length. Remove the sweater and trim the excess elastic off and sew the ends together. Close the opening of the casing by continuing the row of topstitching.
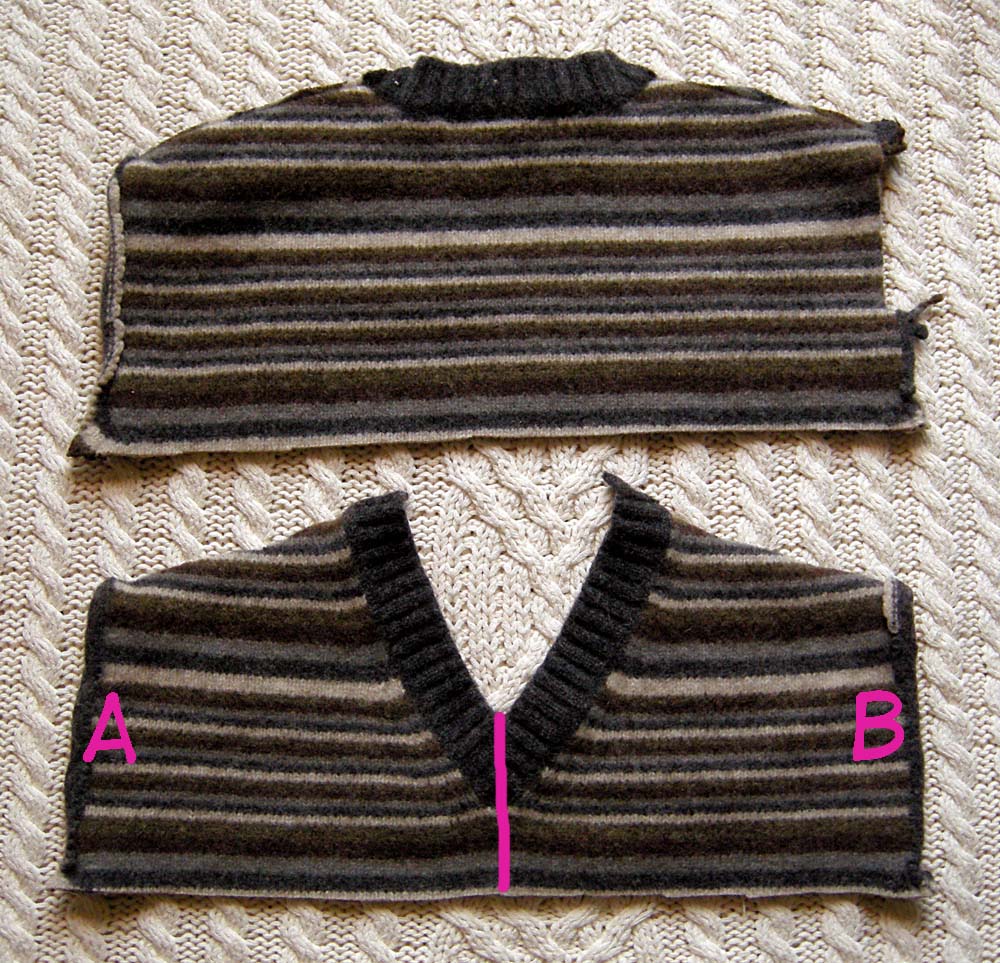
4) Now for the kangaroo pocket! Pull out those extra scraps from the top of the sweater. (If you don’t have big enough scraps, you can use the sleeves.) Shown above are two options. 1: the back of the sweater neckline that can be cut into a trapezoid shape (see photo below), or 2: The front neckline of the sweater. Mine had a V-neck with ribbing. Perfect for pockets trimmed with rib! I simply cut straight up the center and then sewed the arm hole openings (A and B) together.
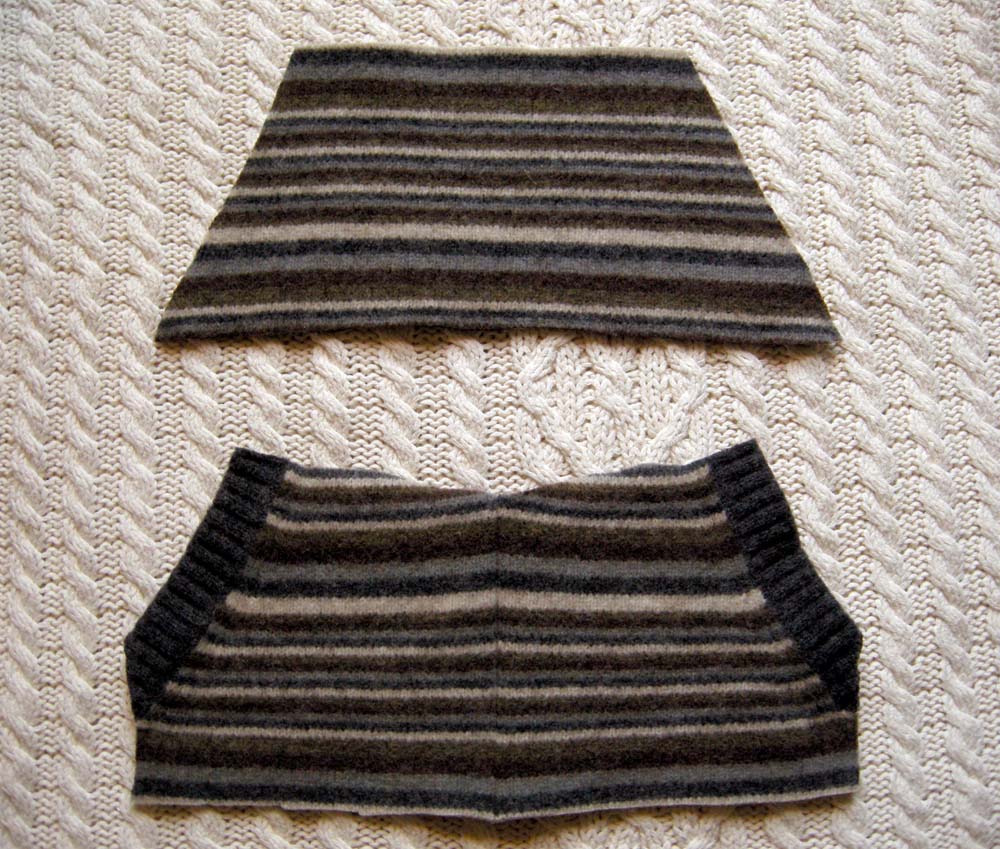
Top: Trapezoid shaped pocket made from back sweater yoke (or a sleeve). Bottom: Sewn pocket made from V-neck yoke.

5) Almost done! Place your pocket piece on the center front of the hip huggie (right side out!) and pin. You can try it on one more time to be sure you like the placement. There’s no need to turn under the edges, the felted wool will not fray. Top stitch around the pocket, 1/8″across the bottom, top and side edges up to the openings.

Is it flattering? No. Is it bulky? Yes, but it is warm. Butt is very warm. 🙂
Hope you have fun with this!
LOL! this is awesome. totally going into my recycling-to-do-list. thanks for sharing!!!
you are so fantastic, Betz!
I so get the “cold butt sitting at the computer” thing! Our heat goes down at night, this means mornings are a bit cool. On days like today, when it’s 22 outside, it can take most of the day to reach the daytime temp. Now, there is a way to layer my bottom half! 🙂 Will try this with the next sweater I find.
Susan
@the_bothy
BRILLIANT!!! I’m going to make one(or two or three) of these for my soon to be 13yr old daughter, she will love it!
I can see an new fashion trend coming to her school 😉
Thank you so much for sharing.
Betz,
You and I get our inspiration from the same place–necessity! I love this idea. And I just so happen to have felted four sweaters last week, so yippee. This is also the perfect solution for someone like me who lives for pockets!
I’ll show you what I make 🙂
xo
Emily
OMG – my butt is ALWAYS cold!!! I’m hunting through my closet now to see what I can transform into a butt snuggie! Thank you so much for this!!
Awesome! Necessity is truly the mother of invention!
You wear it well, Betz! I think it looks great! I might need to make a Body Huggie to make it through this week!!
Too cute! Those pockets are the perfect place to hold my corn cozy.Turn it around and I’ll have a toasty butt.Cozy is a fleece container filled with feed corn rice or cherries pits. Heats in the microwave in minutes.Ah!Now I don’t have to worry about carrying my cozy from spot to spot.Yeah Beth
As my hubby says, “a warm butt is a happy butt.” Love this idea. And you make it look super-cute. I sit at my computer all day too, and it’s not super-warm in here in the winter.
oh my goodness betz, this is the BEST idea ever! you hit a chord with me…i suffer from cold-butt-syndrome as well….i can think of several other good names for this fine garment, but better keep them to myself on a family blog! LOL…thanks…i’m off to goodwill now…it’s 24 right now!
My friend did nearly the exact same thing BUT cut down the middle and sewed together into little pants – gave them to us as a present when we had our daughter. BEST. WARMIES. EVER. The “cuffs” could unroll or not and the top she attached a panel of cotton to that could roll up or down a la yoga pants. They lasted forever.
foooorte! bellissima idea!!!
questo assomiglia a quello che ho postato su haramaki!!!isea da copiare subito e riciclare un vecchio maglione.
this is exactly what I need:D
Love it!! Turn the sleeves into fingerless gloves and you’re totally set when the furnace dies.
Supa cool! I love the way you repurposed that v-neck–really clever. I was just getting ready to make myself a sweater mini, too…
This is brilliant! That’s the bit of me that always stays cold – no more. Thank you!
love the way you used the neckline for the pocket, genious!
A friend bought a nice care that had heated seats and we liked to call that function turning on the pie warmer 🙂
Hello! Just what I need! This is so great idea and you have made this ‘skirt’ so lovely and beautiful colour! The pocket is very good for warming hands! Thank you so much!
I’ll be back soon.
Best wishes from Crete! Teje
So adorable! You inspire me everyday!
YOU ARE A GENIUS! That is one fabulous idea! One that I am going to try! Thank you!
I can’t believe you made this! the reason being, I’ve been in the process of my own out of sweaters, except I was calling it simply, a ‘skirt’ because I’ll be wearing it as a clothing item with tights. Our reasons are different but technique is about the same… Just goes to show how minds can often think in a similar fashion.
I like the name!
So good, recycling.
and it looks adorable on your teeny tiny hiney and slim hips! (said Rubanesque Mary from Richmond)
o, Betz! you are so clever! and I’m sure you look pretty amazing in that, bulky or not. great idea!
Is it flattering? Yes! I actually like the look a lot! I would probably make one out of a t-shirt (have enough built-in insulation around the butt area 😉
And this is why I LOVE visiting your site- you never cease in coming up with innovative, fun ideas! Absolutely brilliant!
That is so cute, and the pockets from the top of the sweater = genius.
This is such a great idea!! Also good if you don´t like to show of your bum.
Thank you!!
Greetings from Spain, here we need to warm up our bums as well…..
OMG,so cuuuuuute! Love this idea, thank you for sharing!
i just looove it!
Oh, i love this idea! Thank you, Micha from Germany
You are one clever gal! Keep up the good work. Thanks & Happy Trails!
You are awesome!! I love this!!! thank you sweet Betz! and Merry Christmas to you and your family xoxo
I bop in every once-in-a-while to see what you are up to because I too, am a “green crafter”. Wool is a medium I enjoy all winter long and I LOVE what you’ve done with it here!
Fun, innovative…classic Betz! Thanks for sharing. Those pockets are BRILLANT!
What a great idea. I think this could catch on as a fashion trend. Thanks for the info!
Love the idea, just wish my sweaters were big enough to go over my hips. I’m a pear and a half…. LOVE it Though… will share.
OMG! I love it! I saved it to show my husband because he always says my butt is cold, LOL! Maybe he can make me one….
I am SO making this! Think I will make one for my “minnie-me” as well!
this solves the afghan fringe getting caught in desk chair wheels problem!
Simply fabulous!
I lurve this! Great idea, and very clever with the pocket. I _will_ find my sewing machine and make this.
–Rena
Awesome idea…I have a daughter in Roller Derby and winter practice is COLD… this will be cute and functional! Score!
This is so groovy! I know that you were featured on Craftzine (that’s how I found you!) so this is probably not a big deal, but I’ve linked to this post on my struggling little blog here: http://myhandmadehell.blogspot.com/2011/01/reconstructed-clothes-round-up.html
I hope this is okay! Let me know if you want me to remove it or make any changes at all.
I LOOOOVE your blog! I can’t wait to read more!
Great Idea! I need one of these for work..lol!
Great Idea, it’s wonderful!
So fun. I MUST do this 🙂
what a brilliant idea! i’m going to raid my hubbys vest stash as we speak
Cute as can be!!!