
As you know I love to play with wool felt. Clean and sculptural shapes, like these braided cuffs, are the perfect project to show off the versatility and beauty of felt. I’ve always wanted to know the trick behind braided leather belts and cuffs that are made from a single piece of leather. How did they do that? It’s a little technique called the “magic braid” and thanks to the internet, mystery solved!


Materials
• 3mm wool felt, about 2″ x 10″ to make one cuff*
• 1 shank button, 1/4″ -1/2″ diameter
• thread
*If you don’t have access to 3mm wool felt, you can use 2 pieces of thinner wool blend felt, bonded together with fusible webbing. Follow my Felt Lore #5 tutorial to learn how.
You can buy 3mm felt here and wool blend felt online here or off the bolt at Joanns. The 3mm felt (teal and orange, above) looks very chunky and graphic, the fused felt (purple/lime and red/pink) make for a great 2 color look. I love them both!
Tools
• ruler and rotary cutter
• disappearing ink fabric pen
• hand sewing needle

1) Measure and cut a strip of felt 1 1/8″ x 9″. Be as precise as you can. This is a simple project with few steps, so it’s important to be accurate for a neat look. A ruler and rotary cutter will be your friend.
2) Mark 2 lines with the length of the strip, 3/8″ from the edges. The space between the 2 lines should also measure 3/8″. (I like to use a Frixion pen and “erase” the markings with an iron after cutting. See my Felt Lore #3 post about marking tools)

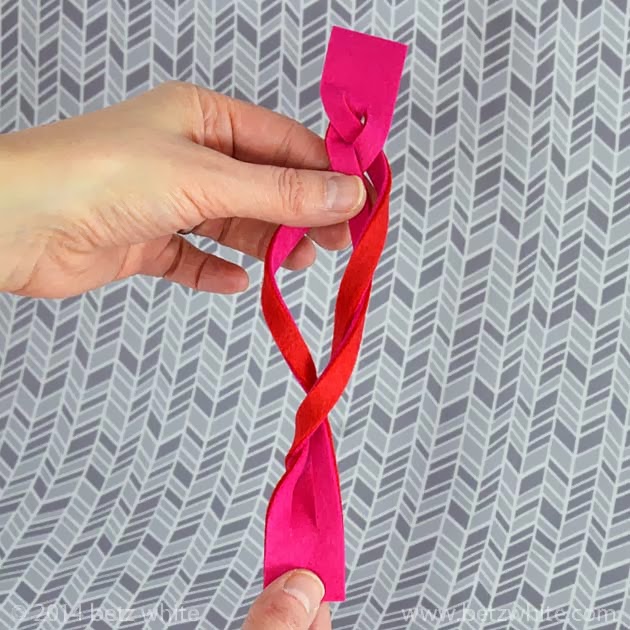
3) Using a rotary cutter and a ruler, carefully cut along the lines, stopping 1″ from each end of the strip. Now you have one piece of felt divided into 3 equal strands but attached at the beginning and end of the strip.
Time to braid! For this tutorial I used 2 colors of felt to help show the 2 different sides during the braiding process. It looks confusing but it’s really quite simple once you get the hang of it!

4) Start at the top left and begin to braid, making 3 passes: left, right, left. Keep all of your braiding pushed up high towards the top as much as possible.
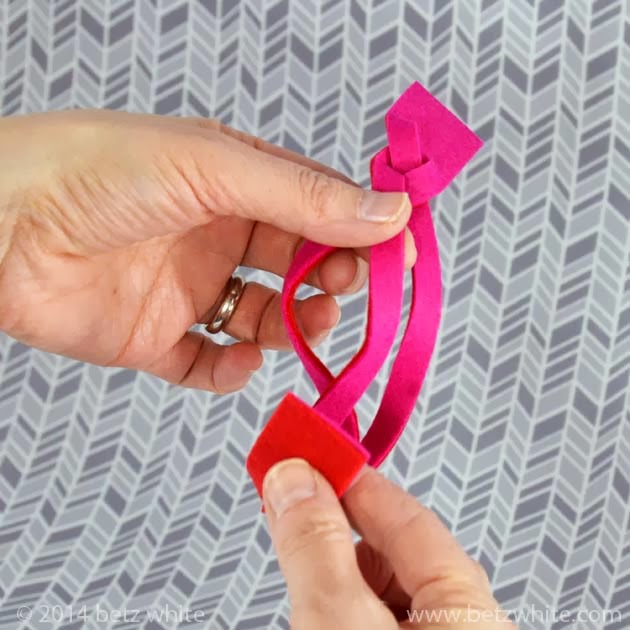


6) Repeat the braiding, only this time start on the right. Make 3 passes, right, left, right. then pick up the lower end and push it through the opening at the right.

7) Now repeat steps 4 and 6 again. You must always do your braiding like this in sets of 2 in order for it to work. If you need help visualizing this in motion, I found this video really helpful!
8) Once you’re done you’ll want to work on the braid to loosen some of the tension at the top of the braid and distribute the cross-overs evenly.

8) Next you’ll want to sew a shank button to one end of the cuff and make a small slit at the other end to serve as the button hole. Because felt doesn’t ravel, you don’t need to finish the button hole. If you are using very thick felt and/or a larger button, you might need to snip perpendicular slits at the ends of the button hole, kind of like a capitol letter “I”.


These are oh-so addictive to make! Perfect as quick Valentine’s Day gifts, friendship bracelets or just a way to add a bright pop to your winter wardrobe!
Things to keep in mind:
• While the technique is simple, it does take a little practice to get the feel of it. You might like to practice on some scraps first to get the hang of it.
• Measure your wrist before beginning. You will lose about 1″ in cuff length due to braiding. I started with a 9″ length for the red/pink cuff. The finished length is 8″ and the overlap when buttoned is about 1″.
• You can make your cuff in a variety of widths, just be sure to make your slits evenly spaced. The orange cuff is 3/4″ wide 3mm felt, the red/pink is 1 1/8″ fused felt, purple/green is 1 1/4″ fused felt and the teal is 1 1/4″ 3mm felt.
• The thicker the felt and the wider the strips, the less times you can braid it.
I hope you enjoyed this tutorial and please let me know if you have any questions!
That is adorable and looks fun to make! Thanks for sharing 🙂
Thanks! Yes, you feel very clever after you make one!
Thanks Betz for sharing your darling cuffs ♥ http://felting.craftgossip.com/2014/01/10/braided-felt-cuff-tutorial/
Thanks for the re-post!
These are really cute! I want to make a ton of them in different colors! Thanks for sharing this great tutorial!
Thanks! They are super fun to make.
super!
Oh! I want to try this with a piece of bicycle inner tube! The girl would LOVE it!
That would be awesome. You could put a heavy duty snap on it.
Oh what a great tutorial and fun idea. I would love to make some for gifts!
I want to make one in every color!!
Have often seen these in leather, but never in felt. I especially love the two coloured version!
Cute maybe a fun craft to do with the kids 🙂
Definitely kid friendly! (well, after the cutting part)
I wonder if these would work with craft felt? We have a wool sensitivity here, and try not to do too much with real wool anything if it can be helped. 🙂
It should! I think it would be good to make it a double layer though to be sure it’s strong enough. Synthetic felt is less durable than wool felt.