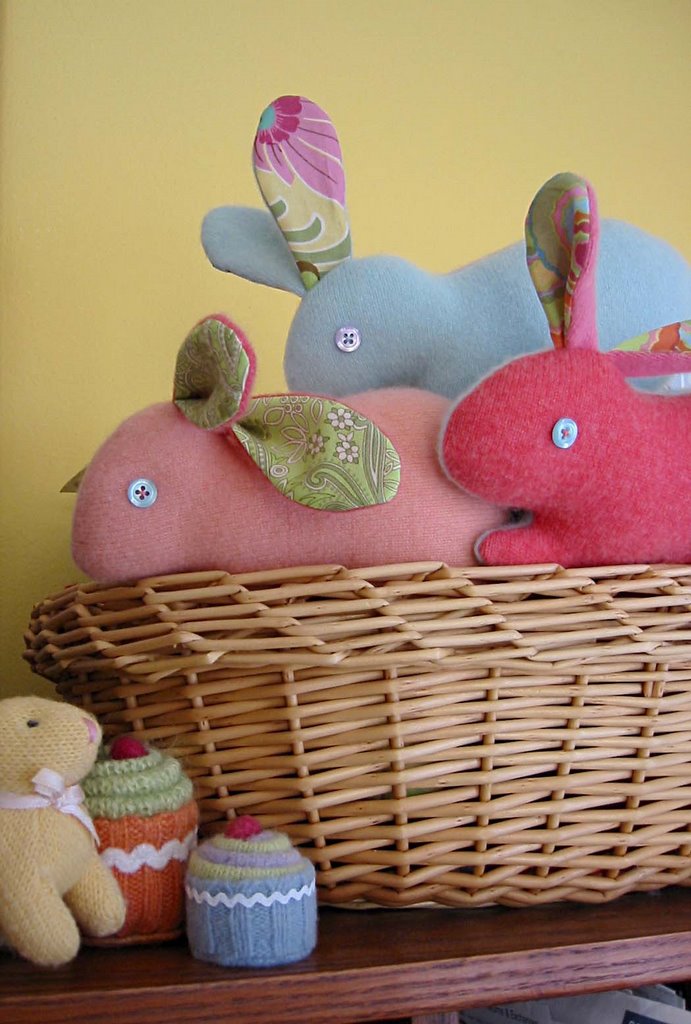
We’ve got bunnies! Super lux cashmere bunnies…mmm! I’ve acquired a lot of scraps from making recycled cashmere scarves last holiday. I’ve been trying to come up with a project that is scrap worthy. These are the perfect snuggle bunnies for the job.
Materials:
- Cashmere sweater
- Scrap of cotton print fabric
- Fiberfill
- Needle felting supplies (optional)
- Buttons, pompom, felt ball, etc.
**PLEASE NOTE: for kids under 3 years old, do not attach buttons, felt balls, etc. Embroider or needle felt all embellishment. It’s safer and just as cute!
I find second hand cashmere sweaters at Goodwill. Here’s a tip: If you have trouble finding them on the sweater rack, look in the blouse/long sleeve shirt area. Wash in hot water and dry in the dryer. They won’t felt, but they will shrink and get a little thicker and fuzzier.

1) Cut a bunny shape out of scrap paper and pin to 2 layers of sweater. I’m using contrast colors with right sides together so I get both sides of the bunny. (make your own bunny shape by tracing a cookie cutter and enlarging. Or you can use mine) Cut 2 ears out of sweater fabirc and 2 ears out of a print lining.

2) Place ear and lining right sides together, pin. Stitch around perimeter (leaving bottom open) with 1/8″ seam allowance.

3) Turn right side out and press.

4) Now it’s time for a little needle felting embellishment on the bunny body. I use the Clover tools, which I did a tutorial on a while ago. First lay out some roving on the mat, crossing the direction of the fibers.

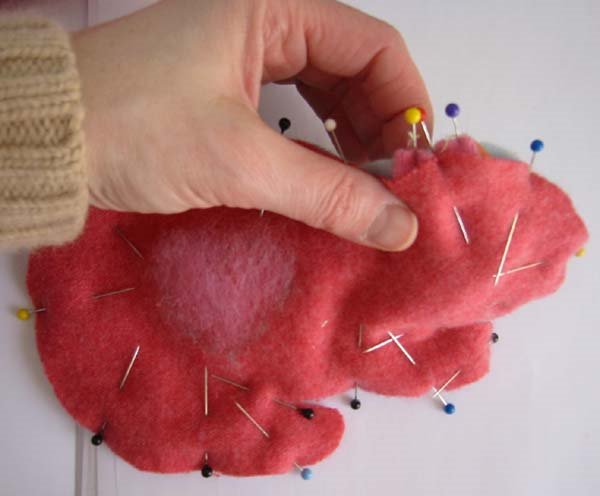
5) Once you get a nice little matted piece of felt, carefully remove from the mat. Using a pattern, cut out a heart shape for each side of the bunny. (save the scraps!)

6) Next place one side of the bunny, right side up, on the mat. Needle felt the shape into place. To keep the edge of the shape defined, I like to outline it with yarn, also needle felted into place. (It might help to use a single felting needle for this, but be sure to transfer work to a foam mat. Do not use a single needle on the Clover mat.)

7) Carefully remove work from mat taking care not to stretch and distort the shape. Steam the back of the work to help set the fibers. Repeat needle felting steps for the other side of the bunny.

8) Now it’s time to assemble! Fold a tuck into the bottom of the ears and pin onto one side of the bunny head.
9) Place the other side of the bunny on top, right sides together, sandwiching the ears between layers. Pin and stitch around perimeter of bunny, leaving a 2″ opening to turn work.

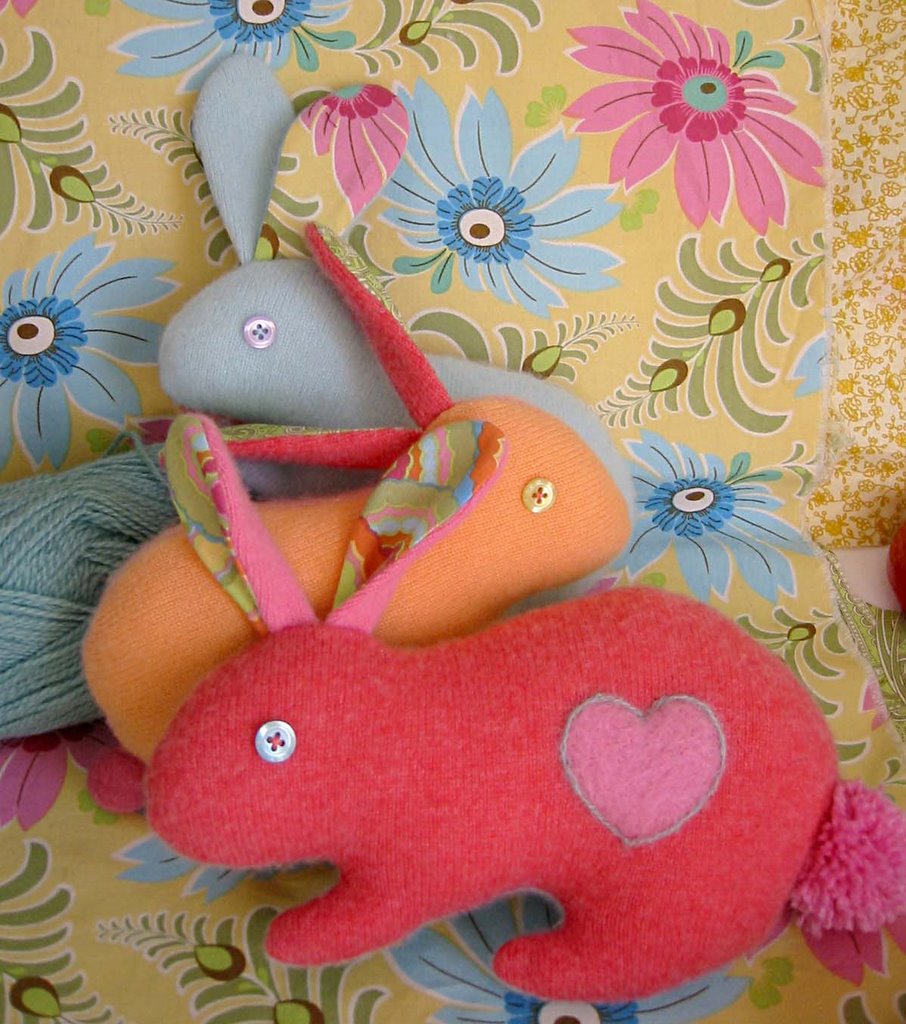
10) Turn work right side out and stuff with fiberfill. No, that little puff is not the tail! 🙂 Hand baste the opening closed, then attach a tail. I used a pompom I made out of yarn for this one and a felt ball tail on the orange bunny. Sew on some button eyes and you’re done!
Oh my goodness, they’re multiplying.

So soft and sweet! (This photo shows the other sides.)
Have fun and let me know if you make some bunnies!
Those bunnies are adorable. I have to get to Goodwill now!! Great toot, too!
super sweet bun buns!
love em:)
smiles
Thank you so much!!!I am from Italy and i am not the only one who loves your works!!!this tutorial is very nice and it will be simple to do for me..thank you and i hope you will do a book about your works!!have a nice day and bless you!!
Can i have your permission to talk about this tutorial on my blog?thank you very much for answering me at dianaquilts.blogspot.com
ciao from Italy..
So cute! Love the felted hearts on them.
ADORABLE!!! Thanks so much for sharing your talent with all of us! Happy weekend~
These bunnies are so cute – thanks for posting the tutorial! I can’t wait to try it out.
Dear Betz,i posted on my blog with your permission about you..thanks again!
Totally *love* these! I posted about them at whip up!
Those bunnies are beautiful, Betz! Love them! 🙂
Lovely!
thanks for share they are lovelly
Thanks so much for this. They’re gorgeous. Definitely going to give these a try:)
One hundred thanks¨! I’ll try to do it with my children.A great, great tutorial, thanks 😉
Once again, you are amazing. I have a few cashmeres that really need to be felted – to old to wear out but still wear in – now I won’t have to totally part with them.
Oh my goodness, those bunnies are some of the cutest things I have ever seen. Thanks so much for sharing with us!
Wow, Betz. Thank you for the little bunny tutorial. They look like candy!
This is wonderful! I have a few thrifting cashmere sweaters in my stash I’ll have to turn into bunnies!
what cute bunnies 🙂
i’ve never found cashmere at my local thrift stores, but maybe i was looking on the wrong racks.
ornamentea is local for me … not even 2 miles away.
these are so cute!!! i must make some tonight…..thanks for the inspiration! and i love that they’re made from cashmere….
Hi!
I saw this over on Whip Up and it’s just too cute, I will have to try it. Thanks so much for sharing the tutorial 🙂
These snuggle bunnies are just the sweetest!!
Thanks for posting the tut…
I came over from Whip Up, too. These are totally adorable! 🙂
Hola!
Those bunnies are so cute! I like very much your work, you are brilliant!
I would like to link this tutorial from my blog. Is it possible?Thank you. Have a nice weekend!
Those bunnies are beyond cute! I love bunnies and have collected them over the years. I’m thinking about making one or two!
Thanks for sharing your talent.
So cute!! I´ll try make one form my baby!!
Those are adorable! I saw your bird change purses in Adorn Magazine today! I was proud to point them out to my sister and say, “I know her! I read her blog.”
Those bunny are sooo cute! (you should send to the Martha show, they’d probably have you back!)
I’ve never worked with recycled sweaters but your work sure makes me want to try!
You are fabulous for sharing this adorable pattern!
So sweet! THank you for the great tutorial. We need more spring here!
I love your rabbits! they’re so lovely!
Thanks so much for such a cute tutorial! I’ll be making some of these pretty soon!
Oh Betz, your tutorials are always so clear, concise and wonderful. The bunnies are perfect for Easter, cute!
Gads I’m so completely loving these!!! I have never done any felting but am so interested… thanks for the lovely tutorial!
xoxo
GADS I love these!! Have never done any felting but am so intrigued! Thanks for the adorable tutorial!
xoxo
These are darling!
Oh my gosh, that is so cute! I will definately try that out on my scraps.
And I have added your book to my wishlist on amazon 🙂
Way cute bunnies ! Thanks for the tutorial !
Hi, Betz! I lucked out a thrift store this week and picked up an embarassing number of cashmere sweaters. I tried your tutorial this afternoon, and it was perfect! What a thorough writer you are. Thank you for sharing.
Here’s the result.
Oh I love these so much! I hope it’s ok if i mention it on my blog – http://fripperee.wordpress.com let me know if you object and I’ll remove the link!
kind regards
Jen
Thanks so much for this tutorial. I made three of these bunnies. Two for a birthday girl and then two for my girls who fell in love!
I didn’t felt designs, but embroidered and appliqued. They can be seen on my blog. Let me know if this is a problem. Of course I will credit you:-)
What super cute bunnies! The felted hearts on them are just darling. Thank you for being so generous in making and sharing this wonderful tutorial!
oooh so cute! makes me want to get my needlefelting out, your bunnies are adorable
it’s so sweet !!!
I made a felt bunny inspired by yours. Thanks for the inspiration! (There’s a pic of mine on my blog…)
Oh, I think I’m in love! What could be sweeter than a soft bunny?! Thanks for the tutorial.
These bunnies are so cute! Thanks for sharing them!!
They are multiplying …. their babies are in France now !!! Come and see !!
Oh my gosh these are just too sweet! Thanks for sharing.
The bunny is way to cute! I tried my hand at making one. I used cream velvet and I can tell you that velvet was NOT a good choice. It looks “ok” but I could not stuff it as much as I wanted to because I was afraid I would burst the seams. I am going to make one out of wool. I have better luck with wool. Can I post a photo of my bunny with a link to your blog on my blog?
sure Becky! link away!
Oh my goodness!
Your bunnies are adorable!
I love the colors.
I will have to try to make,thanks for the tutorial.
What lovely bunnies – wish I had found this tute before Easter – perhaps I will be super organised for next year.
Thank you so much for the tutorial.
If you want to see, this is the link to my bunny: http://auxpetitsoiseaux.blogspot.com/2008/04/arwards-go-tothe-badger.html
VEEEERY cute!!!! I don’t even sew, but with your excellent instructions, I feel like I could attempt a sweet bunny of my own!
I just found cashmere at my local thrift shop – for a quarter no less. I see a bunny in its future! Thanks for the pattern.
Great photos of very cute bunnies. I wonder if some potpourri in the filling would be a nice touch?
Hello!You are great.Your bunnys are so sweet and cute!I like this bunnys so much that i will try do one for my dauther if you will let me,of course.I`ll visit your blog every day.Best wishes.Ana
THANKS! i made one out of an old wool sweater that had been through the dryer a few times for my little girl for christmas. she loved it! “Hop, Hop, Hop!” Thanks for the tutorial. it was super quick – though i did applique a felt heart and stitched the eyes
So cute and just in time for Easter! I did one up real quick and though it’s not the greatest I think my kids will enjoy it.
these are cute, I may have to try to whip some up for our church kids.. thanks so much
This is the cutest tutorial, I am going to make some for my kid’s school teachers. I blogged about this as an Easter Project I love.
Thanks so much for the cute pattern. I’ve got my first one made and three more to go. Did mine with a pink cashmere that didn’t quite felt as much as I’d like, and a brown/tan check that wouldn’t felt at all. So I added a bit of interfacing to stabilize both. Made the leg turns a bit trickier, so next time around I’ll try to find some light weight felt to work with. Thanks again!
Gracias por compartir este hermoso tutorial. Tengo ya hechos mis conejitos para regalar en estas pascuas. Aquí el link, (creo que tan mal no me han quedado)
http://esimperfecto.blogspot.com/2009/04/mi-conejo-favorito.html
Saludos!!!
I love these, it was hard to stop at making four! but they will make great easter presents, thankyou
very nice! I might do this! 🙂 thanks!!!
Happy Easter!
They are Beautiful :3
So generous of you to share this gorgeousness.
I am a bit late to make any for Easter, but bunnies are lovely anytime
Many thanks
xx
sumea
Snazzle Craft (
Muito lindo teu trabalho!
Parabéns!
Abraço,
Necca
OMG!
it’s super cute!
i think ima make one for my cousin that’s going to be born soon!
i hope she likes it!
thank you!
^-^
these are super sweet and very easy! Thank you for the idea!
do you mind if I mention this post in my blog? Thank you for your time!
hello,
that is beautiful!very sweet your bany.
i love your fabrik and the color.
greatings from conny
Did you stitch the bunny together by hand or machine? Can’t wait to make a few. I just felted a bunch of sweaters for this project! Thanks for the inspiration and great tutorial.
Hi Kelley,
I sewed this on the machine but you could also sew it by hand.
Have fun!
Betz
So cute! I know some little ones for whom this project would be perfect.
Thank you so much for these adorable creatures! I just finished making one for my daughter for Easter. I created a tail from some left over faux fur. So cute! i can’t wait to give her her new “hop hop”!
awwwwwwwwww they are so adorable. i’ve been looking for bunny patterns to gift my new baby niece, and i’m making this one with embroiderd eyes.. thanks for the pattern and tute!
Thanks for the super great and super easy tutorial. I was able to whip an adorable little bunny up for my daughter for Easter. I hope to make one for her friend tonight. I blogged about it here – http://heartfelthomemaking.blogspot.com/2010/04/wip-wednesday.html
Oh my this is lovely. I plan to add it to a post I do every Friday on internet finds. I wish I had found this pre-Easter.
Annie
OnceUponAParent.Blogspot.com
That was vary cute bunny! I can’t wait to try it myself. Although, I might look for an alternative for the cashmere sweater – still can’t part with the one I have. Thank you for sharing that bunny craft. I loved it!
They look so dainty and neat. Can you share more tips on recycling a cashmere. I’m a huge fan. Appreciate it.
Lovely! Very lovey! I can even teach my 5-year old girl to do that. I love you concept with cashmere.
I love the feel of cashmere clothing. I am pregnant right now and I want to thank you for sharing this wonderful craft. I finally found something to do.
Love it. So Cute!
The bunnies are amazing, really adorable.
Thanks for sharing
Aanee xxx
Flowers Dublin
I love these bunnies, i have to print this out and get my wife to sow some ASAP
aaawwww. so cute. I am going to teach my kids how to sow these. Thankyou so much for sharing these crafty tips. I am subscribing.
hmm this will make a good sunday afternoon activity for me in front of the tv.
Love the snuggle bunnies!
I like the love hearts on the bunnies
lovely, will make a great little present for my niece
I might do something like this for easter
What a WONDERFUL tutorial. I whipped up three of these cuties this past weekend and have linked your blog and acknowledged your wonderful tutorial on my blog. I hope you’ll take a look at my blog to see how you’ve inspired me. http://thimblesbobbinspaperandink.blogspot.com/2011/03/peter-cottontail-and-basket-of-colorful.html
Cheers!
Jennifer
Absolutely gorgeous i have been looking for a special bunny to make for my grandaughter who has just moved to Aussie as i am unable to give her easter eggs this year,so this will be lovely for her bedroom. A million thanks.
These look so cute and soft! I included these in my link love today.
hi , these bunnies are absolutley beautiful , gosh i wish i had a cashmere sweater to cut up , but i am on the look out for a pink one at the thrift store , they are so sweet and i cant wait to make one , and i love those little cupcakes in the photo , do you have a diy on those ? they are so cute and sweet also , thanks for sharing this i appreciate it and wish you a pink rainbow day
georgia
Thank you for the wonderful tutorial. I used it as one of my first creations for a Toy Society drop. No spare cashmere sweaters, but some fleece scraps worked fine. I linked to your blog from my flickr page to give you credit for the fun pattern. http://www.flickr.com/photos/70952905@N07/
Thanks again for sharing you talent.
Audrey
love your cashmere bunnies. I’m pretty into crafts but I don’t generally have time to do any of them at the moment.
love your tips. think they might help me out long time.. x
such a wonderful blog, found you via pinterest ;0)…great bunny tutorial ;0)
Hi,obrigada pelo passo a passo.
Beijos
thanks so much for sharing this pattern! i just stitched up one for my boys and it came out so stinkin’ cute!
http://www.naturallycraftedmama.com/2012/03/peter-woolentail.html
Lovelly, vou fazer…. bjus Giovanna (www.giovannastewers.com.br)
lovelly eu amei td isso e vou fazer agora mesmo, bjus
These are adorable–how do I get on the receiving list? LOL
What a great idea! I was about to throw away a scarf and found this!
Lovely bunnies! I’ll try to make one for my daughter!
Oooohh, so cute!
Thanks for the cashmere bunny tutorial, I’ll try it soon.
Thanks a lot for these cute bunnies. I’ve made several of them on my blog, and created a hen pattern, that can be also used. I just love them all. Bye !
http://sewingpot.blogspot.fr/2013/03/paques-lapins-et-poules.html
hello,
do you still have the pattern for these bunnies available?
Thanks!
Hi Tonna,
Yes! The link to the template should be working again now.
Betz
Hi there,
Thanks for the great tutorial! I’ve made some bunnies for easter and gave them to friends and Family, they all loved them. 🙂 wish I could upload a picture on here… Thanks again ^^
Managed to upload some pics to flickr – maybe you’d like to have a look? 🙂
https://www.flickr.com/photos/70858751@N03/
Very cute! Thanks for sharing!