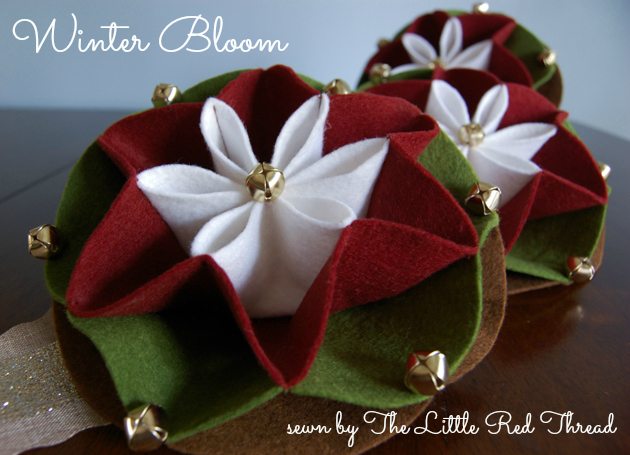
Hello! Rebekah here from The Little Red Thread back for my final Sewing Collective post. I have a small obsession with all things little and cute so it’s no surprise that the Winter Bloom Ornament pattern caught my eye. It has that “vintage paper” ornament look that brings back memories of unearthing boxes of old Christmas decorations from our attic. I love this ornament for its simple style and uniquely festive appeal.

Betz’s directions have made this eye-catching design very easy to scale to any size, not just the one size provided within the pattern PDF.
Here are some helpful must do’s to make your ornament sparkle and shine!
DO use freezer paper. It will help you cut each piece accurately and it’s reusable!
DO make sure you transfer all your markings to each piece of felt
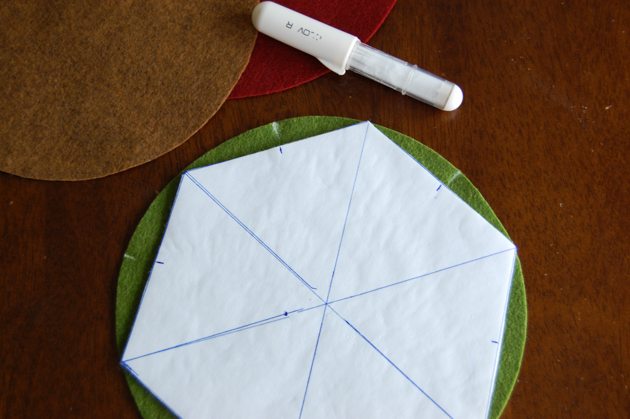
DO use your hexagon template to help mark your circle’s “points”
DO use spray starch to hold your ornament’s shape. I highly recommend using Faultless Premium Starch. It will not flake and dries clean which is great especially if you’re working with dark felt!
As I went along making the original 3” ornament I found the picture diagrams very helpful and referred to them far more than the worded directions. It may be a little confusing at first so I encourage you to make a tester ornament out of scrap felt before you use your project felt. Once you get a feel for how the ornament assembles it becomes a breeze to duplicate the other side…or in my case make it bigger!
If you’ve read my previous Sewing Collective posts you’ll notice that I love to give each of Betz’s patterns my own twist and this one is no exception! It is much too pretty to stay so small. I decided I would scale the ornament up to 7 inches of festivus fun and add not just one jingle bell but 20 more! With a sparkly ribbon for added glam.

Want to make your own super-sized Winter Bloom Door Hanger? Here’s what you’ll need:
(9) 9×12 felt sheets: (3) red, (3) green, (3) brown
(3) 9×12 felt sheets of white
(1) 3” gold circle *I used the Darcie brand gold hoop
a package of medium sized jingle bells (you’ll need 21 total)
3” wide coordinating ribbon 31 ½” long
a drawing compass
straight ruler
spray starch
sewing machine, sewing needle, matching thread, disappearing marking tools or a chalk marker
Use your drawing compass and set it to 3 ½”. On your freezer paper draw out your circle. It should measure 7” wide. Cut it out. Draw a second 7” circle, this one will become your hexagon. Leave the second circle uncut for now.
Take your second 7” circle and make a mark at the very top, it doesn’t need to be precisely centered just eyeball it. Then, using your drawing compass, still set at 3 ½”, start your point at your first mark and make a second mark where your pencil hits. Continue marking each spot you swing your compass in a series of arcs around the entire circle. As you come full circle your drawing compass should land exactly on your starting mark. Next, connect the marks you just made with straight lines to form your hexagon. If you’re not sure you’ve done it properly measure each straight line. They should all be 3 ½” long and the hexagon should measure 7” across from point to point. Cut out your hexagon.
On your hexagon template use a straight ruler to find the exact center between each point and make a mark. You’ll make 6 marks total.
Cut out your felt. You will need to cut out 3 red circles, 3 green circles and 3 brown circles. Then cut out 3 hexagons from your white felt.
Transfer your hexagon markings from the template to your felt hexagons. Then use your hexagon template to make your markings on all 9 felt circles.

Follow Betz’s directions on her pattern for the assembly of the hexagon to layer #1 (red circle) and then attaching that to layer #2 (green circle).
Starch all 3 of your freshly made blooms. I would suggest spraying them a few times, letting them dry thoroughly between each coat. Starching them well will allow them to stand firm and hold their shape as they hang.
Next, take your ribbon length (it should measure approx. 31 ½” long) and fold about 1 ½” through your gold hoop. Sew the ribbon together so the hoop is encased. At the other end of your ribbon cut out a small “V” wedge.
Then take layer #3 (brown circle) and place it 2 ½” down from the bottom of your gold hoop. Sew two lines in the center of your circle about 2” long. This is how your blooms will hang from your ribbon. *The white felt is for illustration purposes*

Continue to attach the next 2 circles spacing each one 2 ½” apart.
Take one of your starched blooms, and center it in the middle of the top brown circle matching up your markings where needed. Stitch the bloom to the brown layer. Repeat for the next 2 blooms until they’re all attached. At this point, you can spray starch your blooms again paying a little more attention to the brown layer.
Once your blooms are nice and dry add your jingle bells. I added one in the middle like Betz’s and then attached one to each of the 6 points around the outer points. Or place them wherever you’d like!

Enjoy your new jingle! If you plan to put this in direct sunlight, for example your front door, please note that the felt may fade over the course of time.
If you don’t fancy a door hanger try doing Betz’s original 3” ornament with smaller ribbon and smaller jingle bells for a hanger you can place over a door knob.
I’d like to thank Betz for inviting me to be a part of a very creative group of women for the Sewing Collective and for allowing me a little creative freedom to explore each of your patterns and to grow my sewing skills. To my fellow Collective bloggers, you all have done some amazing pattern twists and I’ve enjoyed everyone’s tips immensely. It was an honor to share the fun with you!
I hope everyone has a wonderful Holiday season this year!

Happiest Sewing Everyone!

This post is part of the Betz White Sewing Collective series. Content is written by compensated contributors expressing their own views and opinions.

Great update! This is simple and beautiful on the door!